
TCP Manager 1.0 serial key or number

TCP Manager 1.0 serial key or number
RStudio Server Professional Edition 1.3.1093-1
9.1 Product Activation
9.1.1 Activation Basics
When RStudio Server is first installed on a system it operates in evaluation mode for a period of time and then subsequently requires activation for continued use.
To determine the current license status of your system you can use the following command:
After purchasing a license to RStudio Server you’ll receive a license key that can be used to activate the license on a given system.
You can activate your license key with the command:
Note that you need to restart the server in order for licensing changes to take effect.
If you want to move your license of RStudio Server to another system you should first deactivate it on the old system with the command:
9.2 License Details
RStudio Server Pro licenses include some details that you’ll see when you run the command. These are part of the license and can’t be changed without purchasing a different license. They are as follows:
| Value | Meaning |
|---|---|
| Whether the Job Launcher is enabled. | |
| The maximum number of concurrent R sessions that can be run; 0 if unlimited. | |
| The maximum number of users that can connect to the server; 0 if unlimited. |
Typically, RStudio Server Pro licenses either disable the Launcher but allow for unlimited local users and sessions, or enable the Launcher and provide limits on users and/or sessions. If you have questions about the best kind of license for your use case, contact sales@rstudio.com for help.
Note that when named user licenses are in effect ( is greater than 0), R Session Auditing is enabled by default to help you keep track of which users are using the product.
9.3 Connectivity Requirements
In order to activate or deactivate RStudio Server, internet connectivity is required for communication with the licensing server. If your server is behind an internet proxy or not connected to the Internet at all this section describes what’s required to successfully activate.
Additionally, your server should have a synchronized system clock, using or some other clock syncing service. If the server’s clock is sufficiently incorrect, licensing verification will fail.
9.3.1 Proxy Servers
If your server is behind an internet proxy, you may need to add an additional command line flag indicating the address and credentials required to communicate through the proxy. This may not be necessary if either the or environment variable is defined (these are read and used by the license manager when available).
If you do need to specify a proxy server explicitly you can do so using the command line parameter. For example:
Proxy settings can include a host-name, port, and username/password if necessary. The following are all valid proxy configurations:
If the port is not specified, the license manager will default to using port .
9.3.2 Offline Activation
If your system has no connection to the Internet it’s also possible to perform an offline activation. To do this, we recommend using our offline activation application which will walk you through the process: RStudio Offline Activation
To activate your license offline, you first generate an offline activation request as follows:
Executing this command will print an offline activation request to the terminal which you should copy and paste and enter into our offline activation application or send to RStudio customer support (support@rstudio.com). You will receive a reply with a file attachment that can be used to activate offline as follows:
Note that you need to restart the server in order for licensing changes to take effect.
If you are renewing your license or want to move your license of RStudio Server to another system you can also perform license deactivation offline. You can do this as follows:
Executing this command will print an offline deactivation request to the terminal which you should copy and paste and enter into the offline activation application then send to RStudio customer support (support@rstudio.com).
You can also perform an offline check of your current license status using the following command:
9.4 Evaluations
9.4.1 Extending Evaluations
If you are unable to complete your evaluation of RStudio Server during the initial evaluation period, contact your Customer Success Representative or RStudio Sales (sales@rstudio.com) to obtain a key with an extended evaluation period.
Once you have the key, supply it to RStudio Server using the command.
If you are performing the evaluation on a physical machine (not on virtualized hardware or containers) without a network connection, you may also request an offline evaluation extension key, which does not require an internet connection. This key may be supplied to RStudio Server as follows:
Note that offline evaluation extension keys are valid only on machines which do not have Internet access and are not virtualized. For most offline evaluation extensions, you will need to generate an offline evaluation request (see below for details).
9.4.2 Connectivity Requirements
9.4.2.1 Beginning Evaluations
Generally speaking, there are no network requirements during the evaluation period. Inside virtual machines or sandboxes (such as Docker), however, Internet access is required to begin the evaluation period.
If you have a proxy, you can supply it using the argument as described above. If however you have no means of connecting to the Internet from inside the virtual environment, you can begin the evaluation as follows:
Executing this command will print an offline activation request to the terminal which you should copy and paste and then send to RStudio customer support (support@rstudio.com). You will receive a reply with a file attachment that can be used to begin the evaluation offline as follows:
9.4.2.2 Extending Evaluations
You may extend evaluations offline using the same pattern described above (just use and ):
Then, when you’ve received the evaluation file:
9.5 Floating Licensing
If you stop and start RStudio Server instances frequently, for instance because you’re running them inside virtual machines or containers, you may wish to use floating licensing instead of traditional licensing.
To use floating licensing, you run a small, lightweight server, which holds a license that grants you the right to run a certain number of concurrent RStudio Server instances.
When RStudio Server starts, it will connect to the license server and obtain a temporary lease, releasing it when RStudio Server is stopped. Using this method, you can have any number of RStudio Server instances, so long as you do not run more instances at once than specified in your license.
9.5.1 Floating License Keys
A license key which distributes floating license leases is not the same as a traditional license key, and the two cannot be used interchangeably. If you have purchased traditional license keys and wish to exchange them for a floating license key, or vice versa, please get in touch with RStudio customer support (support@rstudio.com).
9.5.2 The RStudio Server Pro License Server
The RStudio Pro License server supplies licenses to RStudio Server Pro. It is available for Linux, Mac, and Windows. A license server can supply licenses to any platform; for instance, you can run your license server on Windows and distribute licenses to RStudio Server Pro instances running Linux.
9.5.2.1 Linux
The RStudio License Server site contains Linux license server downloads for all RStudio products. Download and install the license server for RStudio Server Pro. You then activate your license key with the command:
The file contains configuration settings for the RStudio Server Pro License server, including the network port to listen on and any proxy settings required for connecting to the Internet.
9.5.2.2 Mac and Windows
The RStudio License Server site contains downloads for the Mac and Windows license servers. These require a few additional configuration steps. They can be set up as follows (order is important):
- Download the license server () appropriate to your platform, and place it in the directory where you wish it to run.
- Copy the file to the same directory as , and change its name to .
- If activating online, run the command .
- If activating offline, follow the offline activation steps. Note that it is necessary to supply the fully qualified path to file arguments to , even if they are in the same directory as the executable.
- After successful activation, with administrator permissions. This will install the license server as a service that will start automatically and run in the background.
For additional help with Mac and Windows license server installation and configuration, refer to the official TurboFloat Server documentation.
9.5.3 License Server Hardware Requirements
While the license server is designed to distribute licenses to ephemeral virtual machines or containers, which may move freely between hosts, the license server itself must stay on the same physical host on which it was activated.
It is acceptable to run the license server inside a container or a virtual machine, as long as the container or the VM always runs on the same hardware. Stopping the license server, moving it to a different physical host, and starting it again will cause it to become deactivated. Because it’s often impractical to try to ensure that the server only runs on a particular host, we recommend running the license server outside containers and virtualization software.
Note that the system requirements for the license server are very low, so it can be run on almost any server. If your environment will not allow for ensuring that the server stays on a single physical host, please contact support@rstudio.com to discuss alternate licensing options.
9.5.4 License Server Offline Activation
The command requires an internet connection. If your license server has no connection to the Internet it’s also possible to perform an offline activation. The process for doing this on the license server is identical to the process used to activate RStudio Server offline. Generate an offline activation request as follows:
Executing this command will print an offline activation request to the terminal which you should copy and paste and then send to RStudio customer support (support@rstudio.com). You will receive a reply with a file attachment that can be used to activate offline as follows:
9.5.5 Using Floating Licensing
Once your license server is up and running, you need to tell RStudio Server to use floating licensing instead of traditional licensing.
/etc/rstudio/rserver.conf
The value indicates that RStudio Server should connect to a remote licensing server to obtain a license; the value can be used to explicitly specify traditional (local) activation.
Then, tell RStudio Server which licensing server to connect to:
You only need to run the command once; RStudio Server saves the server name and will use it on each subsequent startup.
Depending on your system configuration, it is possible that the RStudio Server service will be started before the service which allows hostname resolution (this is known to be the case for example on some Amazon EC2 systems). If this is the case, you’ll want to specify the license server using a private IP address rather than a hostname, so that RStudio Server can acquire a license immediately when starting up.
9.5.6 Specifying a License Server
RStudio supports three methods for connecting to a license server. You can select the method by specifying the license server as follows:
9.5.6.1 Connecting Over TCP
Example
By default, the RStudio Server Pro License Server listens via raw TCP on port 8989. If you specify the only the hostname or IP address of the license server, this the kind of connection you’ll get.
If you wish to use a different port, you will need to specify the port in , and specify to RStudio Server as .
9.5.6.2 Connecting Over HTTPS
Example
You can also connect to the license server via HTTPS rather than raw TCP. This can be useful when using proxies or load balancers in front of the license server. Note that the license server does not use HTTPS by default, so you can only use this connectivity method if you have configured your license server to use HTTPS.
Configuring the license server for HTTPS support is outside the scope of this guide. You can read instructions here:
Configuring TurboFloat Server for HTTPS Communication
9.5.6.3 Connecting to a Hosted Server
Example
Finally, if you are connecting to a hosted license server, specify the UUID of the server rather than its hostname. Hosted license servers are run by our licensing vendor, WyDay, and do not require you to run anything in your own network. Read more about setting up a hosted license server and getting a UUID here:
Creating a LicenseChest Server
9.5.7 Configuring License Leases
When using floating licenses, you can optionally determine how long the license leases last by setting the value on the licensing server. This value is in seconds, so for instance to make license leases last 30 minutes you would use the following syntax:
/etc/rsp-license-server.conf
The lease length controls how frequently the RStudio Server instances need to contact the licensing server to renew their license leases in order for the lease to remain valid.
A shorter lease length will increase tolerance to failures on RStudio Server instances by making leases available for reuse more quickly. RStudio Server will release its lease immediately if shut down normally, but if abnormally terminated, the lease will not be released until it expires.
A longer lease length will increase tolerance to transient failures on the network and the RStudio Server Pro License Server. Any such issues that can be resolved before the lease is due for renewal won’t interrupt use of RStudio Server.
We generally recommend using a longer lease length. Use a short lease length only if your environment routinely encounters abnormal terminations of the server or the container/instance on which it runs.
9.5.8 License Server Downtime Tolerance
RStudio Server does not wait until its lease has fully expired before it renews it. It renews its lease when it is halfway to expiry. For instance, if you use 30 minute leases, RStudio Server will actually renew its lease every 15 minutes.
This means that it is possible to take down the license server for a short period of time without affecting any running RStudio Server instances. Because of the aforementioned behavior, no existing lease will be more than halfway to expiry if the server goes down.You have a grace period of N/2 (where N is the length of the lease) during which the server can be offline without consequences. For instance, if you use 30 minute leases, your license server can be offline for 15 minutes.
9.5.9 Lease Expiration and Renewal
Under normal conditions RStudio Server will automatically renew its license lease in a configurable interval as described above. However, there are situations in which it will be unable to do so, such as a network problem, or an issue on the host running the license server.
When RStudio Server cannot obtain a license lease, either because there are no leases currently available or because it can’t reach the licensing server, it will begin automatically attempting to acquire a lease every 10 seconds. This interval is configurable; for instance, to retry every 30 seconds instead you would set the following value:
/etc/rstudio/rserver.conf
If you don’t want RStudio Server to attempt to reestablish a license lease automatically, set the value to to disable retries. In this case you will need to manually restart RStudio Server in order to reestablish the lease. This can be useful if you often run more instances than you have keys for, and wish to have more control over which RStudio Server instances receive license leases from the limited pool on the license server.
9.5.10 Troubleshooting Floating Licensing
To validate that the license server has been successfully activated, run the command. This will report the version of the server as well as the license key and the number of available slots.
If your server is activated but you’re still having trouble with floating licensing, you can tell the RStudio Server Pro License Server to emit more detailed logs. Change the log level to :
/etc/rsp-license-server.conf
Then, restart the license server, tail the licensing log, and start your RStudio Server instances.
At the level, the licensing log will tell you the total number of licenses associated with your key, and how many are currently in use. It will also notify you when RStudio Server instances acquire leases, and when those leases are released, renewed, or expired. No rotation is done for this log, so it’s recommended to use the level in production.
9.6 Userspace Licensing
In a standard installation of RStudio Server Professional, licensing configuration operations require elevated access (e.g. via sudo). This is appropriate given the product will normally be installed and activated by an administrator on behalf of multiple user accounts.
Alternatively, the licensing system may be switched to a “userspace” model where the licensing commands are available to a non-elevated user account. This is a system-wide setting; it is not possible to mix both models on a single system.
9.6.1 Switching to Userspace Licensing
Before switching, stop the server, and deactivate any existing license-key or license-server.
Next, disable the standard system-level licensing mode by deleting the “verify” file.
Initialize the license system in userspace mode. Note this command must not be run elevated, but as the RStudio Server account (normally ) as described in Server Account.
Confirm that the mode was successfully changed.
The line indicates successful switch to userspace licensing (versus the default setting of ).
At this point, the user may perform licensing commands without using “sudo”, such as activating a license-key or configuring a license-server.
Ssh (Secure Shell)
Secure Shell (SSH) is a cryptographicnetwork protocol for operating network services securely over an unsecured network.[1] Typical applications include remote command-line, login, and remote command execution, but any network service can be secured with SSH.
SSH provides a secure channel over an unsecured network by using a client–server architecture, connecting an SSH client application with an SSH server.[2] The protocol specification distinguishes between two major versions, referred to as SSH-1 and SSH-2. The standard TCP port for SSH is 22. SSH is generally used to access Unix-like operating systems, but it can also be used on Microsoft Windows. Windows 10 uses OpenSSH as its default SSH client and SSH server.[3]
Despite popular misconception, SSH is not an implementation of Telnet with cryptography provided by the Secure Sockets Layer (SSL).
SSH was designed as a replacement for Telnet and for unsecured remote shell protocols such as the Berkeley rsh and the related rlogin and rexec protocols. Those protocols send information, notably passwords, in plaintext, rendering them susceptible to interception and disclosure using packet analysis.[4] The encryption used by SSH is intended to provide confidentiality and integrity of data over an unsecured network, such as the Internet, although files leaked by Edward Snowden indicate that the National Security Agency can sometimes decrypt SSH, allowing them to read, modify and selectively suppress the contents of SSH sessions.[5]
SSH can also be run using SCTP rather than TCP as the connection oriented transport layer protocol.[6]
The IANA has assigned TCPport 22, UDP port 22 and SCTP port 22 for this protocol.[7]
Definition[edit]
SSH uses public-key cryptography to authenticate the remote computer and allow it to authenticate the user, if necessary.[2] There are several ways to use SSH; one is to use automatically generated public-private key pairs to simply encrypt a network connection, and then use password authentication to log on.
Another is to use a manually generated public-private key pair to perform the authentication, allowing users or programs to log in without having to specify a password. In this scenario, anyone can produce a matching pair of different keys (public and private). The public key is placed on all computers that must allow access to the owner of the matching private key (the owner keeps the private key secret). While authentication is based on the private key, the key itself is never transferred through the network during authentication. SSH only verifies whether the same person offering the public key also owns the matching private key. In all versions of SSH it is important to verify unknown public keys, i.e. associate the public keys with identities, before accepting them as valid. Accepting an attacker's public key without validation will authorize an unauthorized attacker as a valid user.
Authentication: OpenSSH key management[edit]
On Unix-like systems, the list of authorized public keys is typically stored in the home directory of the user that is allowed to log in remotely, in the file ~/.ssh/authorized_keys.[8] This file is respected by SSH only if it is not writable by anything apart from the owner and root. When the public key is present on the remote end and the matching private key is present on the local end, typing in the password is no longer required. However, for additional security the private key itself can be locked with a passphrase.
The private key can also be looked for in standard places, and its full path can be specified as a command line setting (the option -i for ssh). The ssh-keygen utility produces the public and private keys, always in pairs.
SSH also supports password-based authentication that is encrypted by automatically generated keys. In this case, the attacker could imitate the legitimate server side, ask for the password, and obtain it (man-in-the-middle attack). However, this is possible only if the two sides have never authenticated before, as SSH remembers the key that the server side previously used. The SSH client raises a warning before accepting the key of a new, previously unknown server. Password authentication can be disabled.
Usage[edit]
SSH is typically used to log into a remote machine and execute commands, but it also supports tunneling, forwardingTCP ports and X11 connections; it can transfer files using the associated SSH file transfer (SFTP) or secure copy (SCP) protocols.[2] SSH uses the client-server model.
The standard TCP port 22 has been assigned for contacting SSH servers.[9]
An SSH client program is typically used for establishing connections to an SSH daemon accepting remote connections. Both are commonly present on most modern operating systems, including macOS, most distributions of Linux, OpenBSD, FreeBSD, NetBSD, Solaris and OpenVMS. Notably, versions of Windows prior to Windows 10 version 1709 do not include SSH by default. Proprietary, freeware and open source (e.g. PuTTY,[10] and the version of OpenSSH which is part of Cygwin[11]) versions of various levels of complexity and completeness exist. File managers for UNIX-like systems (e.g. Konqueror) can use the FISH protocol to provide a split-pane GUI with drag-and-drop. The open source Windows program WinSCP[12] provides similar file management (synchronization, copy, remote delete) capability using PuTTY as a back-end. Both WinSCP[13] and PuTTY[14] are available packaged to run directly off a USB drive, without requiring installation on the client machine. Setting up an SSH server in Windows typically involves enabling a feature in Settings app. In Windows 10 version 1709, an official Win32 port of OpenSSH is available.
SSH is important in cloud computing to solve connectivity problems, avoiding the security issues of exposing a cloud-based virtual machine directly on the Internet. An SSH tunnel can provide a secure path over the Internet, through a firewall to a virtual machine.[15]
History and development[edit]
Version 1.x[edit]
In 1995, Tatu Ylönen, a researcher at Helsinki University of Technology, Finland, designed the first version of the protocol (now called SSH-1) prompted by a password-sniffing attack at his university network.[16] The goal of SSH was to replace the earlier rlogin, TELNET, FTP[17] and rsh protocols, which did not provide strong authentication nor guarantee confidentiality. Ylönen released his implementation as freeware in July 1995, and the tool quickly gained in popularity. Towards the end of 1995, the SSH user base had grown to 20,000 users in fifty countries.
In December 1995, Ylönen founded SSH Communications Security to market and develop SSH. The original version of the SSH software used various pieces of free software, such as GNU libgmp, but later versions released by SSH Communications Security evolved into increasingly proprietary software.
It was estimated that by the year 2000 the number of users had grown to 2 million.[18]
Version 2.x[edit]
"Secsh" was the official Internet Engineering Task Force's (IETF) name for the IETF working group responsible for version 2 of the SSH protocol.[19] In 2006, a revised version of the protocol, SSH-2, was adopted as a standard. This version is incompatible with SSH-1. SSH-2 features both security and feature improvements over SSH-1. Better security, for example, comes through Diffie–Hellman key exchange and strong integrity checking via message authentication codes. New features of SSH-2 include the ability to run any number of shell sessions over a single SSH connection.[20] Due to SSH-2's superiority and popularity over SSH-1, some implementations such as libssh (v0.8.0+),[21]Lsh[22] and Dropbear[23] support only the SSH-2 protocol.
Version 1.99[edit]
In January 2006, well after version 2.1 was established, RFC 4253 specified that an SSH server which supports both 2.0 and prior versions of SSH should identify its protoversion as 1.99.[24] This is not an actual version but a method to identify backward compatibility.
OpenSSH and OSSH[edit]
In 1999, developers, wanting a free software version to be available, went back to the older 1.2.12 release of the original SSH program, which was the last released under an open source license. Björn Grönvall's OSSH was subsequently developed from this codebase. Shortly thereafter, OpenBSD developers forked Grönvall's code and did extensive work on it, creating OpenSSH, which shipped with the 2.6 release of OpenBSD. From this version, a "portability" branch was formed to port OpenSSH to other operating systems.[25]
As of 2005[update], OpenSSH was the single most popular SSH implementation, coming by default in a large number of operating systems. OSSH meanwhile has become obsolete.[26] OpenSSH continues to be maintained and supports the SSH-2 protocol, having expunged SSH-1 support from the codebase with the OpenSSH 7.6 release.
Uses[edit]

SSH is a protocol that can be used for many applications across many platforms including most Unix variants (Linux, the BSDs including Apple'smacOS, and Solaris), as well as Microsoft Windows. Some of the applications below may require features that are only available or compatible with specific SSH clients or servers. For example, using the SSH protocol to implement a VPN is possible, but presently only with the OpenSSH server and client implementation.
- For login to a shell on a remote host (replacing Telnet and rlogin)
- For executing a single command on a remote host (replacing rsh)
- For setting up automatic (passwordless) login to a remote server (for example, using OpenSSH[27])
- In combination with rsync to back up, copy and mirror files efficiently and securely
- For forwarding a port
- For tunneling (not to be confused with a VPN, which routes packets between different networks, or bridges two broadcast domains into one).
- For using as a full-fledged encrypted VPN. Note that only OpenSSH server and client supports this feature.
- For forwarding X from a remote host (possible through multiple intermediate hosts)
- For browsing the web through an encrypted proxy connection with SSH clients that support the SOCKS protocol.
- For securely mounting a directory on a remote server as a filesystem on a local computer using SSHFS.
- For automated remote monitoring and management of servers through one or more of the mechanisms discussed above.
- For development on a mobile or embedded device that supports SSH.
- For securing file transfer protocols.
File transfer protocols[edit]
The Secure Shell protocols are used in several file transfer mechanisms.
Architecture[edit]
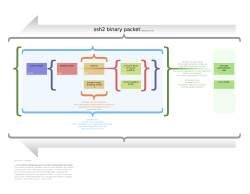
The SSH-2 protocol has an internal architecture (defined in RFC 4251) with well-separated layers, namely:
- The transport layer (RFC 4253), which typically runs on top of TCP/IP. This layer handles initial key exchange as well as server authentication, and sets up encryption, compression and integrity verification. It exposes to the upper layer an interface for sending and receiving plaintext packets with sizes of up to 32,768 bytes each (more can be allowed by the implementation). The transport layer also arranges for key re-exchange, usually after 1 GB of data has been transferred or after 1 hour has passed, whichever occurs first.
- The user authentication layer (RFC 4252). This layer handles client authentication and provides a number of authentication methods. Authentication is client-driven: when one is prompted for a password, it may be the SSH client prompting, not the server. The server merely responds to the client's authentication requests. Widely used user-authentication methods include the following:
- password: a method for straightforward password authentication, including a facility allowing a password to be changed. Not all programs implement this method.
- publickey: a method for public key-based authentication, usually supporting at least DSA, ECDSA or RSA keypairs, with other implementations also supporting X.509 certificates.
- keyboard-interactive (RFC 4256): a versatile method where the server sends one or more prompts to enter information and the client displays them and sends back responses keyed-in by the user. Used to provide one-time password authentication such as S/Key or SecurID. Used by some OpenSSH configurations when PAM is the underlying host-authentication provider to effectively provide password authentication, sometimes leading to inability to log in with a client that supports just the plain password authentication method.
- GSSAPI authentication methods which provide an extensible scheme to perform SSH authentication using external mechanisms such as Kerberos 5 or NTLM, providing single sign-on capability to SSH sessions. These methods are usually implemented by commercial SSH implementations for use in organizations, though OpenSSH does have a working GSSAPI implementation.
- The connection layer (RFC 4254). This layer defines the concept of channels, channel requests and global requests using which SSH services are provided. A single SSH connection can host multiple channels simultaneously, each transferring data in both directions. Channel requests are used to relay out-of-band channel-specific data, such as the changed size of a terminal window or the exit code of a server-side process. Additionally, each channel performs its own flow control using the receive window size. The SSH client requests a server-side port to be forwarded using a global request. Standard channel types include:
- shell for terminal shells, SFTP and exec requests (including SCP transfers)
- direct-tcpip for client-to-server forwarded connections
- forwarded-tcpip for server-to-client forwarded connections
- The SSHFP DNS record (RFC 4255) provides the public host key fingerprints in order to aid in verifying the authenticity of the host.
This open architecture provides considerable flexibility, allowing the use of SSH for a variety of purposes beyond a secure shell. The functionality of the transport layer alone is comparable to Transport Layer Security (TLS); the user-authentication layer is highly extensible with custom authentication methods; and the connection layer provides the ability to multiplex many secondary sessions into a single SSH connection, a feature comparable to BEEP and not available in TLS.
Algorithms[edit]
Vulnerabilities[edit]
SSH-1[edit]
In 1998, a vulnerability was described in SSH 1.5 which allowed the unauthorized insertion of content into an encrypted SSH stream due to insufficient data integrity protection from CRC-32 used in this version of the protocol.[33][34] A fix known as SSH Compensation Attack Detector[35] was introduced into most implementations. Many of these updated implementations contained a new integer overflow vulnerability[36] that allowed attackers to execute arbitrary code with the privileges of the SSH daemon, typically root.
In January 2001 a vulnerability was discovered that allows attackers to modify the last block of an IDEA-encrypted session.[37] The same month, another vulnerability was discovered that allowed a malicious server to forward a client authentication to another server.[38]
Since SSH-1 has inherent design flaws which make it vulnerable, it is now generally considered obsolete and should be avoided by explicitly disabling fallback to SSH-1.[38] Most modern servers and clients support SSH-2.[39]
CBC plaintext recovery[edit]
In November 2008, a theoretical vulnerability was discovered for all versions of SSH which allowed recovery of up to 32 bits of plaintext from a block of ciphertext that was encrypted using what was then the standard default encryption mode, CBC.[40] The most straightforward solution is to use CTR, counter mode, instead of CBC mode, since this renders SSH resistant to the attack.[40]
Possible vulnerabilities[edit]
On December 28, 2014 Der Spiegel published classified information[5] leaked by whistleblower Edward Snowden which suggests that the National Security Agency may be able to decrypt some SSH traffic. The technical details associated with such a process were not disclosed.
An analysis in 2017 of the hacking tools BothanSpy & Gyrfalcon suggested that the SSH protocol itself was not compromised.[41]
Standards documentation[edit]
The following RFC publications by the IETF "secsh" working group document SSH-2 as a proposed Internet standard.
- RFC 4250 - The Secure Shell (SSH) Protocol Assigned Numbers
- RFC 4251 - The Secure Shell (SSH) Protocol Architecture
- RFC 4252 - The Secure Shell (SSH) Authentication Protocol
- RFC 4253 - The Secure Shell (SSH) Transport Layer Protocol
- RFC 4254 - The Secure Shell (SSH) Connection Protocol
- RFC 4255 - Using DNS to Securely Publish Secure Shell (SSH) Key Fingerprints
- RFC 4256 - Generic Message Exchange Authentication for the Secure Shell Protocol (SSH)
- RFC 4335 - The Secure Shell (SSH) Session Channel Break Extension
- RFC 4344 - The Secure Shell (SSH) Transport Layer Encryption Modes
- RFC 4345 - Improved Arcfour Modes for the Secure Shell (SSH) Transport Layer Protocol
It was later modified and expanded by the following publications.
- RFC 4419 - Diffie-Hellman Group Exchange for the Secure Shell (SSH) Transport Layer Protocol (March 2006)
- RFC 4432 - RSA Key Exchange for the Secure Shell (SSH) Transport Layer Protocol (March 2006)
- RFC 4462 - Generic Security Service Application Program Interface (GSS-API) Authentication and Key Exchange for the Secure Shell (SSH) Protocol (May 2006)
- RFC 4716 - The Secure Shell (SSH) Public Key File Format (November 2006)
- RFC 4819 - Secure Shell Public Key Subsystem (March 2007)
- RFC 5647 - AES Galois Counter Mode for the Secure Shell Transport Layer Protocol (August 2009)
- RFC 5656 - Elliptic Curve Algorithm Integration in the Secure Shell Transport Layer (December 2009)
- RFC 6187 - X.509v3 Certificates for Secure Shell Authentication (March 2011)
- RFC 6239 - Suite B Cryptographic Suites for Secure Shell (SSH) (May 2011)
- RFC 6594 - Use of the SHA-256 Algorithm with RSA, Digital Signature Algorithm (DSA), and Elliptic Curve DSA (ECDSA) in SSHFP Resource Records (April 2012)
- RFC 6668 - SHA-2 Data Integrity Verification for the Secure Shell (SSH) Transport Layer Protocol (July 2012)
- RFC 7479 - Ed25519 SSHFP Resource Records (March 2015)
- RFC 5592 - Secure Shell Transport Model for the Simple Network Management Protocol (SNMP) (June 2009)
- RFC 6242 - Using the NETCONF Protocol over Secure Shell (SSH) (June 2011)
- draft-gerhards-syslog-transport-ssh-00 - SSH transport mapping for SYSLOG (July 2006)
- draft-ietf-secsh-filexfer-13 - SSH File Transfer Protocol (July 2006)
In addition, the OpenSSH project includes several vendor protocol specifications/extensions:
See also[edit]
References[edit]
- ^T. Ylonen; C. Lonvick (January 2006). The Secure Shell (SSH) Protocol Architecture. Network Working Group of the IETF. doi:10.17487/RFC4251. RFC4251.
- ^ abc Network Working Group of the IETF, January 2006, RFC 4252, The Secure Shell (SSH) Authentication Protocol
- ^"OpenSSH in Windows". Microsoft Docs. 7 January 2019.
- ^"SSH Hardens the Secure Shell". Serverwatch.com. Archived from the original on 2008-12-23.
- ^ ab"Prying Eyes: Inside the NSA's War on Internet Security". Spiegel Online. December 28, 2014. Archived from the original on January 24, 2015.
- ^Seggelmann, R.; Tuxen, M.; Rathgeb, E.P. (18–20 July 2012). "SSH over SCTP — Optimizing a multi-channel protocol by adapting it to SCTP". Communication Systems, Networks & Digital Signal Processing (CSNDSP), 2012 8th International Symposium on: 1–6. doi:10.1109/CSNDSP.2012.6292659. ISBN .
- ^"Service Name and Transport Protocol Port Number Registry".
- ^"How To Set Up Authorized Keys". Archived from the original on 2011-05-10.
- ^"Service Name and Transport Protocol Port Number Registry". iana.org. Archived from the original on 2001-06-04.
- ^"Download PuTTY - a free SSH and telnet client for Windows". Putty.org. Archived from the original on 2014-05-27. Retrieved 2014-04-28.
- ^"Cygwin Package List". Retrieved January 5, 2016.
- ^"WinSCP home page". Archived from the original on 2014-02-17.
- ^"WinSCP page for PortableApps.com". Archived from the original on 2014-02-16.
- ^"PuTTY page for PortableApps.com". Archived from the original on 2014-02-16.
- ^Amies, A; Wu, C F; Wang, G C; Criveti, M (2012). "Networking on the cloud". IBM developerWorks. Archived from the original on 2013-06-14.
- ^Tatu Ylönen. "The new skeleton key: changing the locks in your network environment". Archived from the original on 2017-08-20.
- ^Tatu Ylönen. "SSH Port". Archived from the original on 2017-08-03.
- ^Nicholas Rosasco and David Larochelle. "How and Why More Secure Technologies Succeed in Legacy Markets: Lessons from the Success of SSH"(PDF). Quoting Barrett and Silverman, SSH, the Secure Shell: The Definitive Guide, O'Reilly & Associates (2001). Dept. of Computer Science, Univ. of Virginia. Archived(PDF) from the original on 2006-06-25. Retrieved 2006-05-19.
- ^"Secsh Protocol Documents". VanDyke Software, Inc. Archived from the original on 2010-01-13.
- ^"SSH Frequently Asked Questions". Archived from the original on 2004-10-10.
- ^"libssh".
- ^"A GNU implementation of the Secure Shell protocols". Archived from the original on 2012-02-04.
- ^"Dropbear SSH". Archived from the original on 2011-10-14.
- ^"RFC 4253". Section 5. Compatibility With Old SSH Versions. Archived from the original on 2010-07-04., IETF
- ^"OpenSSH: Project History and Credits". openssh.com. 2004-12-22. Archived from the original on 2013-12-24. Retrieved 2014-04-27.
- ^"OSSH Information for VU#419241". Archived from the original on 2007-09-27.
- ^Sobell, Mark (2012). A Practical Guide to Linux Commands, Editors, and Shell Programming (3rd Edition). Upper Saddle River, NJ: Prentice Hall. pp. 702–704. ISBN .
- ^RFC 8709
- ^ abStebila, D.; Green J. (December 2009). "RFC5656 - Elliptic Curve Algorithm Integration in the Secure Shell Transport Layer". Archived from the original on 19 July 2012. Retrieved 12 November 2012.Cite journal requires (help)
- ^Miller, D.; Valchev, P. (September 3, 2007). "The use of UMAC in the SSH Transport Layer Protocol / draft-miller-secsh-umac-00.txt". Archived from the original on 19 August 2014. Retrieved 12 November 2012.Cite journal requires (help)
- ^RFC 4253
- ^RFC 5647
- ^"SSH Insertion Attack". Core Security Technologies. Archived from the original on 2011-07-08.
- ^"Vulnerability Note VU#13877 - Weak CRC allows packet injection into SSH sessions encrypted with block ciphers". US CERT. Archived from the original on 2010-07-10.
- ^"SSH CRC-32 Compensation Attack Detector Vulnerability". SecurityFocus. Archived from the original on 2008-07-25.
- ^"Vulnerability Note VU#945216 - SSH CRC32 attack detection code contains remote integer overflow". US CERT. Archived from the original on 2005-10-13.
- ^"Vulnerability Note VU#315308 - Weak CRC allows last block of IDEA-encrypted SSH packet to be changed without notice". US CERT. Archived from the original on 2010-07-11.
- ^ ab"Vulnerability Note VU#684820 - SSH-1 allows client authentication to be forwarded by a malicious server to another server". US CERT. Archived from the original on 2009-09-01.
- ^"How to use SSH keys for authentication". Up Cloud. Retrieved 29 November 2019.
- ^ ab"Vulnerability Note VU#958563 - SSH CBC vulnerability". US CERT. Archived from the original on 2011-06-22.
- ^Tatu Ylonen. "BothanSpy & Gyrfalcon - Analysis of CIA hacking tools for SSH", ssh.com, 3 August 2017. Retrieved 15 july 2018.
Networking and RabbitMQ
Overview
Clients communicate with RabbitMQ over the network. All protocols supported by the broker are TCP-based. Both RabbitMQ and the operating system provide a number of knobs that can be tweaked. Some of them are directly related to TCP and IP operations, others have to do with application-level protocols such as TLS. This guide covers multiple topics related to networking in the context of RabbitMQ. This guide is not meant to be an extensive reference but rather an overview. Some tuneable parameters discussed are OS-specific. This guide focuses on Linux when covering OS-specific subjects, as it is the most common platform RabbitMQ is deployed on.
There are several areas which can be configured or tuned. Each has a section in this guide:
This guide also covers a few topics closely related to networking:
Except for OS kernel parameters and DNS, all RabbitMQ settings are configured via RabbitMQ configuration file(s).
Networking is a broad topic. There are many configuration options that can have positive or negative effect on certain workloads. As such, this guide does not try to be a complete reference but rather offer an index of key tunable parameters and serve as a starting point.
In addition, this guide touches on a few topics closely related to networking, such as
and more.
A methodology for troubleshooting of networking-related issues is covered in a separate guide.
Network Interfaces for Client Connections
For RabbitMQ to accept client connections, it needs to bind to one or more interfaces and listen on (protocol-specific) ports. One such interface/port pair is called a listener in RabbitMQ parlance. Listeners are configured using the listeners.tcp.* configuration option(s).
TCP listeners configure both an interface and port. The following example demonstrates how to configure AMQP 0-9-1 and AMQP 1.0 listener to use a specific IP and the standard port:
listeners.tcp.1 = 192.168.1.99:5672By default, RabbitMQ will listen on port 5672 on all available interfaces. It is possible to limit client connections to a subset of the interfaces or even just one, for example, IPv6-only interfaces. The following few sections demonstrate how to do it.
Listening on Dual Stack (Both IPv4 and IPv6) Interfaces
The following example demonstrates how to configure RabbitMQ to listen on localhost only for both IPv4 and IPv6:
listeners.tcp.1 = 127.0.0.1:5672 listeners.tcp.2 = ::1:5672With modern Linux kernels and Windows releases, when a port is specified and RabbitMQ is configured to listen on all IPv6 addresses but IPv4 is not disabled explicitly, IPv4 address will be included, so
listeners.tcp.1 = :::5672is equivalent to
listeners.tcp.1 = 0.0.0.0:5672 listeners.tcp.2 = :::5672Listening on IPv6 Interfaces Only
In this example RabbitMQ will listen on an IPv6 interface only:
listeners.tcp.1 = fe80::2acf:e9ff:fe17:f97b:5672In IPv6-only environments the node must also be configured to use IPv6 for inter-node communication and CLI tool connections.
Listening on IPv4 Interfaces Only
In this example RabbitMQ will listen on an IPv4 interface only:
listeners.tcp.1 = 192.168.1.99:5672It is possible to disable non-TLS connections by disabling all regular TCP listeners. Only TLS-enabled clients will be able to connect:
# disables non-TLS listeners, only TLS-enabled clients will be able to connect listeners.tcp = none listeners.ssl.default = 5671 ssl_options.cacertfile = /path/to/ca_certificate.pem ssl_options.certfile = /path/to/server_certificate.pem ssl_options.keyfile = /path/to/server_key.pem ssl_options.verify = verify_peer ssl_options.fail_if_no_peer_cert = falsePort Access
RabbitMQ nodes bind to ports (open server TCP sockets) in order to accept client and CLI tool connections. Other processes and tools such as SELinux may prevent RabbitMQ from binding to a port. When that happens, the node will fail to start.
CLI tools, client libraries and RabbitMQ nodes also open connections (client TCP sockets). Firewalls can prevent nodes and CLI tools from communicating with each other. Make sure the following ports are accessible:
- 4369: epmd, a peer discovery service used by RabbitMQ nodes and CLI tools
- 5672, 5671: used by AMQP 0-9-1 and 1.0 clients without and with TLS
- 25672: used for inter-node and CLI tools communication (Erlang distribution server port) and is allocated from a dynamic range (limited to a single port by default, computed as AMQP port + 20000). Unless external connections on these ports are really necessary (e.g. the cluster uses federation or CLI tools are used on machines outside the subnet), these ports should not be publicly exposed. See networking guide for details.
- 35672-35682: used by CLI tools (Erlang distribution client ports) for communication with nodes and is allocated from a dynamic range (computed as server distribution port + 10000 through server distribution port + 10010). See networking guide for details.
- 15672: HTTP API clients, management UI and rabbitmqadmin (only if the management plugin is enabled)
- 61613, 61614: STOMP clients without and with TLS (only if the STOMP plugin is enabled)
- 1883, 8883: (MQTT clients without and with TLS, if the MQTT plugin is enabled
- 15674: STOMP-over-WebSockets clients (only if the Web STOMP plugin is enabled)
- 15675: MQTT-over-WebSockets clients (only if the Web MQTT plugin is enabled)
- 15692: Prometheus metrics (only if the Prometheus plugin is enabled)
It is possible to configure RabbitMQ to use different ports and specific network interfaces.
How to Temporarily Stop New Client Connections
Starting with RabbitMQ 3.8.8, client connection listeners can be suspended to prevent new client connections from being accepted. Existing connections will not be affected in any way.
This can be useful during node operations and is one of the steps performed when a node is put into maintenance mode.
To suspend all listeners on a node and prevent new client connections to it, use rabbitmqctl suspend_listeners:
rabbitmqctl suspend_listenersAs all other CLI commands, this command can be invoked against an arbitrary node (including remote ones) using the -n switch:
# suspends listeners on node rabbit@node2.cluster.rabbitmq.svc: it won't accept any new client connections rabbitmqctl suspend_listeners -n rabbit@node2.cluster.rabbitmq.svcTo resume all listeners on a node and make it accept new client connections again, use rabbitmqctl resume_listeners:
rabbitmqctl resume_listeners # resumes listeners on node rabbit@node2.cluster.rabbitmq.svc: it will accept new client connections again rabbitmqctl resume_listeners -n rabbit@node2.cluster.rabbitmq.svcBoth operations will leave log entries in the node's log.
EPMD and Inter-node Communication
What is EPMD and How is It Used?
epmd (for Erlang Port Mapping Daemon) is a small additional daemon that runs alongside every RabbitMQ node and is used by the runtime to discover what port a particular node listens on for inter-node communication. The port is then used by peer nodes and CLI tools.
When a node or CLI tool needs to contact node rabbit@hostname2 it will do the following:
- Resolve hostname2 to an IPv4 or IPv6 address using the standard OS resolver or a custom one specified in the inetrc file
- Contact epmd running on hostname2 using the above address
- Ask epmd for the port used by node rabbit on it
- Connect to the node using the resolved IP address and the discovered port
- Proceed with communication
EPMD Interface
epmd will listen on all interfaces by default. It can be limited to a number of interfaces using the ERL_EPMD_ADDRESS environment variable:
# makes epmd listen on loopback IPv6 and IPv4 interfaces export ERL_EPMD_ADDRESS="::1"When ERL_EPMD_ADDRESS is changed, both RabbitMQ node and epmd on the host must be stopped. For epmd, use
# Stops local epmd process. # Use after shutting down RabbitMQ. epmd -killto terminate it. The service will be started by the local RabbitMQ node automatically on boot.
The loopback interface will be implicitly added to that list (in other words, epmd will always bind to the loopback interface).
EPMD Port
The default epmd port is 4369, but this can be changed using the ERL_EPMD_PORT environment variable:
# makes epmd bind to port 4369 export ERL_EPMD_PORT="4369"All hosts in a cluster must use the same port.
When ERL_EPMD_PORT is changed, both RabbitMQ node and epmd on the host must be stopped. For epmd, use
# Stops local epmd process. # Use after shutting down RabbitMQ. epmd -killto terminate it. The service will be started by the local RabbitMQ node automatically on boot.
Inter-node Communication Port Range
RabbitMQ nodes will use a port from a certain range known as the inter-node communication port range. The same port is used by CLI tools when they need to contact the node. The range can be modified.
RabbitMQ nodes communicate with CLI tools and other nodes using a port known as the distribution port. It is dynamically allocated from a range of values. For RabbitMQ, the default range is limited to a single value computed as RABBITMQ_NODE_PORT (AMQP 0-9-1 and AMQP 1.0 port) + 20000, which results in using port 25672. This single port can be configured using the RABBITMQ_DIST_PORT environment variable.
RabbitMQ command line tools also use a range of ports. The default range is computed by taking the RabbitMQ distribution port value and adding 10000 to it. The next 10 ports are also part of this range. Thus, by default, this range is 35672 through 35682. This range can be configured using the RABBITMQ_CTL_DIST_PORT_MIN and RABBITMQ_CTL_DIST_PORT_MAX environment variables. Note that limiting the range to a single port will prevent more than one CLI tool from running concurrently on the same host and may affect CLI commands that require parallel connections to multiple cluster nodes. A port range of 10 is therefore a recommended value.
When configuring firewall rules it is highly recommended to allow remote connections on the inter-node communication port from every cluster member and every host where CLI tools might be used. epmd port must be open for CLI tools and clustering to function.
The range used by RabbitMQ can also be controlled via two configuration keys:
- kernel.inet_dist_listen_min in the classic config format only
- kernel.inet_dist_listen_max in the classic config format only
They define the range's lower and upper bounds, inclusive.
The example below uses a range with a single port but a value different from default:
[ {kernel, [ {inet_dist_listen_min, 33672}, {inet_dist_listen_max, 33672} ]}, {rabbit, [ ... ]} ].To verify what port is used by a node for inter-node and CLI tool communication, run
epmd -nameson that node's host. It will produce output that looks like this:
epmd: up and running on port 4369 with data: name rabbit at port 25672Inter-node Communication Buffer Size Limit
Inter-node connections use a buffer for data pending to be sent. Temporary throttling on inter-node traffic is applied when the buffer is at max allowed capacity. The limit is controlled via the RABBITMQ_DISTRIBUTION_BUFFER_SIZEenvironment variable in kilobytes. Default value is 128 MB (128000 kB).
In clusters with heavy inter-node traffic increasing this value may have a positive effect on throughput. Values lower than 64 MB are not recommended.
Using IPv6 for Inter-node Communication (and CLI Tools)
In addition to exclusive IPv6 use for client connections for client connections, a node can also be configured to use IPv6 exclusively for inter-node and CLI tool connectivity.
This involves configuration in a few places:
- Inter-node communication protocol setting in the runtime
- Configuring IPv6 to be used by CLI tools
- epmd, a service involved in inter-node communication (discovery)
It is possible to use IPv6 for inter-node and CLI tool communication but use IPv4 for client connections or vice versa. Such configurations can be hard to troubleshoot and reason about, so using the same IP version (e.g. IPv6) across the board or a dual stack setup is recommended.
Inter-node Communication Protocol
To instruct the runtime to use IPv6 for inter-node communication and related tasks, use the RABBITMQ_SERVER_ADDITIONAL_ERL_ARGS environment variable to pass a couple of flags:
# these flags will be used by RabbitMQ nodes RABBITMQ_SERVER_ADDITIONAL_ERL_ARGS="-kernel inetrc '/etc/rabbitmq/erl_inetrc' -proto_dist inet6_tcp" # these flags will be used by CLI tools RABBITMQ_CTL_ERL_ARGS="-proto_dist inet6_tcp"RABBITMQ_SERVER_ADDITIONAL_ERL_ARGS above uses two closely related flags:
- -kernel inetrc to configure a path to an inetrc file that controls hostname resolution
- -proto_dist inet6_tcp to tell the node to use IPv6 when connecting to peer nodes and listening for CLI tool connections
The erl_inetrc file at /etc/rabbitmq/erl_inetrc will control hostname resolution settings. For IPv6-only environments, it must include the following line:
%% Tells DNS client on RabbitMQ nodes and CLI tools to resolve hostnames to IPv6 addresses. %% The trailing dot is not optional. {inet6,true}.CLI Tools
With CLI tools, use the same runtime flag as used for RabbitMQ nodes above but provide it using a different environment variable, RABBITMQ_CTL_ERL_ARGS:
RABBITMQ_CTL_ERL_ARGS="-proto_dist inet6_tcp"Note that once instructed to use IPv6, CLI tools won't be able to connect to nodes that do not use IPv6 for inter-node communication. This involves the epmd service running on the same host as target RabbitMQ node.
epmd
epmd is a small helper daemon that runs next to a RabbitMQ node and lets its peers and CLI tools discover what port they should use to communicate to it. It can be configured to bind to a specific interface, much like RabbitMQ listeners. This is done using the ERL_EPMD_ADDRESS environment variable:
export ERL_EPMD_ADDRESS="::1"
By default RabbitMQ nodes will use an IPv4 interface when connecting to epmd. Nodes that are configured to use IPv6 for inter-node communication (see above) will also use IPv6 to connect to epmd.
When epmd is configured to use IPv6 exclusively but RabbitMQ nodes are not, RabbitMQ will log an error message similar to this:
Protocol 'inet_tcp': register/listen error: econnrefusedsystemd Unit File
On distributions that use systemd, the epmd.socket service controls network settings of epmd. It is possible to configure epmd to only listen on IPv6 interfaces:
ListenStream=[::1]:4369The service will need reloading after its unit file has been updated:
systemctl daemon-reload systemctl restart epmd.socket epmd.serviceIntermediaries: Proxies and Load Balancers
Proxies and load balancers are fairly commonly used to distribute client connections between cluster nodes. Proxies can also be useful to make it possible for clients to access RabbitMQ nodes without exposing them publicly. Intermediaries can also have side effects on connections.
Proxy Effects
Proxies and load balancers introduce an extra network hop (or even multiple ones) between client and its target node. Intermediaries also can become a network contention point: their throughput will then become a limiting factor for the entire system. Network bandwidth overprovisioning and throughput monitoring for proxies and load balancers are therefore very important.
Intermediaries also may terminate "idle" TCP connections when there's no activity on them for a certain period of time. Most of the time it is not desirable. Such events will result in abrupt connection closure log messages on the server end and I/O exceptions on the client end.
When heartbeats are enabled on a connection, it results in periodic light network traffic. Therefore heartbeats have a side effect of guarding client connections that can go idle for periods of time against premature closure by proxies and load balancers.
Heartbeat timeouts from 10 to 30 seconds will produce periodic network traffic often enough (roughly every 5 to 15 seconds) to satisfy defaults of most proxy tools and load balancers. Values that are too low will produce false positives.
Proxy Protocol
RabbitMQ supports Proxy protocol versions 1 (text header format) and 2 (binary header format).
The protocol makes servers such as RabbitMQ aware of the actual client IP address when connections go over a proxy (e.g. HAproxy or AWS ELB). This makes it easier for the operator to inspect connection origins in the management UI or CLI tools.
The protocol spec dictates that either it must be applied to all connections or none of them for security reasons, this feature is disabled by default and needs to be enabled for individual protocols supported by RabbitMQ. To enable it for AMQP 0-9-1 and AMQP 1.0 clients:
proxy_protocol = trueWhen proxy protocol is enabled, clients won't be able to connect to RabbitMQ directly unless they themselves support the protocol. Therefore, when this option is enabled, all client connections must go through a proxy that also supports the protocol and is configured to send a Proxy protocol header. HAproxy and AWS ELB documentation explains how to do it.
When proxy protocol is enabled and connections go through a compatible proxy, no action or modifications are required from client libraries. The communication is entirely transparent to them.
STOMP and MQTT, as well as Web STOMP and Web MQTT have their own settings that enable support for the proxy protocol.
TLS (SSL) Support
It is possible to encrypt connections using TLS with RabbitMQ. Authentication using peer certificates is also possible. Please refer to the TLS/SSL guide for more information.
Tuning for Throughput
Tuning for throughput is a common goal. Improvements can be achieved by
- Increasing TCP buffer sizes
- Ensuring Nagle's algorithm is disabled
- Enabling optional TCP features and extensions
For the latter two, see the OS-level tuning section below.
Note that tuning for throughput will involve trade-offs. For example, increasing TCP buffer sizes will increase the amount of RAM used by every connection, which can be a significant total server RAM use increase.
TCP Buffer Size
This is one of the key tunable parameters. Every TCP connection has buffers allocated for it. Generally speaking, the larger these buffers are, the more RAM is used per connection and better the throughput. On Linux, the OS will automatically tune TCP buffer size by default, typically settling on a value between 80 and 120 KB.
For maximum throughput, it is possible to increase buffer size using a group of config options:
- tcp_listen_options for AMQP 0-9-1 and AMQP 1.0
- mqtt.tcp_listen_options for MQTT
- stomp.tcp_listen_options for STOMP
Note that increasing TCP buffer size will increase how much RAM the node uses for every client connection.
The following example sets TCP buffers for AMQP 0-9-1 connections to 192 KiB:
tcp_listen_options.backlog = 128 tcp_listen_options.nodelay = true tcp_listen_options.linger.on = true tcp_listen_options.linger.timeout = 0 tcp_listen_options.sndbuf = 196608 tcp_listen_options.recbuf = 196608The same example for MQTT:
mqtt.tcp_listen_options.backlog = 128 mqtt.tcp_listen_options.nodelay = true mqtt.tcp_listen_options.linger.on = true mqtt.tcp_listen_options.linger.timeout = 0 mqtt.tcp_listen_options.sndbuf = 196608 mqtt.tcp_listen_options.recbuf = 196608and STOMP:
stomp.tcp_listen_options.backlog = 128 stomp.tcp_listen_options.nodelay = true stomp.tcp_listen_options.linger.on = true stomp.tcp_listen_options.linger.timeout = 0 stomp.tcp_listen_options.sndbuf = 196608 stomp.tcp_listen_options.recbuf = 196608Note that setting send and receive buffer sizes to different values can be dangerous and not recommended.
Erlang VM I/O Thread Pool
Erlang runtime uses a pool of threads for performing I/O operations asynchronously. The size of the pool is configured via the RABBITMQ_IO_THREAD_POOL_SIZE environment variable. The variable is a shortcut to setting the +A VM command line flag, e.g. +A 128.
# reduces number of I/O threads from 128 to 32 RABBITMQ_IO_THREAD_POOL_SIZE=32To set the flag directly, use the RABBITMQ_SERVER_ADDITIONAL_ERL_ARGS environment variable:
RABBITMQ_SERVER_ADDITIONAL_ERL_ARGS="+A 128"Default value in recent RabbitMQ releases is 128 (30 previously). Nodes that have 8 or more cores available are recommended to use values higher than 96, that is, 12 or more I/O threads for every core available. Note that higher values do not necessarily mean better throughput or lower CPU burn due to waiting on I/O.
Tuning for a Large Number of Connections
Some workloads, often referred to as "the Internet of Things", assume a large number of client connections per node, and a relatively low volume of traffic from each node. One such workload is sensor networks: there can be hundreds of thousands or millions of sensors deployed, each emitting data every several minutes. Optimising for the maximum number of concurrent clients can be more important than for total throughput.
Several factors can limit how many concurrent connections a single node can support:
- Maximum number of open file handles (including sockets) as well as other kernel-enforced resource limits
- Amount of RAM used by each connection
- Amount of CPU resources used by each connection
- Maximum number of Erlang processes the VM is configured to allow.
Open File Handle Limit
Most operating systems limit the number of file handles that can be opened at the same time. When an OS process (such as RabbitMQ's Erlang VM) reaches the limit, it won't be able to open any new files or accept any more TCP connections.
How the limit is configured varies from OS to OS and distribution to distribution, e.g. depending on whether systemd is used. For Linux, Controlling System Limits on Linux in our Debian and RPM installation guides provides. Linux kernel limit management is covered by many resources on the Web, including the open file handle limit.
With Docker, Docker daemon configuration file in the host controls the limits.
MacOS uses a similar system.
On Windows, the limit for the Erlang runtime is controlled using the ERL_MAX_PORTS environment variable.
When optimising for the number of concurrent connections, make sure your system has enough file descriptors to support not only client connections but also files the node may use. To calculate a ballpark limit, multiply the number of connections per node by 1.5. For example, to support 100,000 connections, set the limit to 150,000.
Increasing the limit slightly increases the amount of RAM idle machine uses but this is a reasonable trade-off.
Per Connection Memory Consumption: TCP Buffer Size
See the section above for an overview.
For maximum number of concurrent client connections, it is possible to decrease TCP buffer size using a group of config options:
- tcp_listen_options for AMQP 0-9-1 and AMQP 1.0
- mqtt.tcp_listen_options for MQTT
- stomp.tcp_listen_options for STOMP
Decreasing TCP buffer size will decrease how much RAM the node uses for every client connection.
This is often necessary in environments where the number of concurrent connections sustained per node is more important than throughput.
The following example sets TCP buffers for AMQP 0-9-1 connections to 32 KiB:
tcp_listen_options.backlog = 128 tcp_listen_options.nodelay = true tcp_listen_options.linger.on = true tcp_listen_options.linger.timeout = 0 tcp_listen_options.sndbuf = 32768 tcp_listen_options.recbuf = 32768The same example for MQTT:
mqtt.tcp_listen_options.backlog = 128 mqtt.tcp_listen_options.nodelay = true mqtt.tcp_listen_options.linger.on = true mqtt.tcp_listen_options.linger.timeout = 0 mqtt.tcp_listen_options.sndbuf = 32768 mqtt.tcp_listen_options.recbuf = 32768and for STOMP:
stomp.tcp_listen_options.backlog = 128 stomp.tcp_listen_options.nodelay = true stomp.tcp_listen_options.linger.on = true stomp.tcp_listen_options.linger.timeout = 0 stomp.tcp_listen_options.sndbuf = 32768 stomp.tcp_listen_options.recbuf = 32768Note that lowering TCP buffer sizes will result in a proportional throughput drop, so an optimal value between throughput and per-connection RAM use needs to be found for every workload.
Setting send and receive buffer sizes to different values is dangerous and is not recommended. Values lower than 8 KiB are not recommended.
Reducing CPU Footprint of Stats Emission
A large number of concurrent connections will generate a lot of metric (stats) emission events. This increases CPU consumption even with mostly idle connections. To reduce this footprint, increase the statistics collection interval using the collect_statistics_interval key:
# sets the interval to 60 seconds collect_statistics_interval = 60000The default is 5 seconds (5000 milliseconds).
Increasing the interval value to 30-60s will reduce CPU footprint and peak memory consumption. This comes with a downside: with the value in the example above, metrics of said entities will refresh every 60 seconds.
This can be perfectly reasonable in an externally monitored production system but will make management UI less convenient to use for operators.
Limiting Number of Channels on a Connection
Channels also consume RAM. By optimising how many channels applications use, that amount can be decreased. It is possible to cap the max number of channels on a connection using the channel_max configuration setting:
channel_max = 16Note that some libraries and tools that build on top of RabbitMQ clients may implicitly require a certain number of channels. Values above 200 are rarely necessary. Finding an optimal value is usually a matter of trial and error.
Nagle's Algorithm ("nodelay")
Disabling Nagle's algorithm is primarily useful for reducing latency but can also improve throughput.
kernel.inet_default_connect_options and kernel.inet_default_listen_options must include {nodelay, true} to disable Nagle's algorithm for inter-node connections.
When configuring sockets that serve client connections, tcp_listen_options must include the same option. This is the default.
The following example demonstrates that. First, rabbitmq.conf:
tcp_listen_options.backlog = 4096 tcp_listen_options.nodelay = truewhich should be used together with the following bits in the advanced config file:
[ {kernel, [ {inet_default_connect_options, [{nodelay, true}]}, {inet_default_listen_options, [{nodelay, true}]} ]}].When using the classic config format, everything is configured in a single file:
[ {kernel, [ {inet_default_connect_options, [{nodelay, true}]}, {inet_default_listen_options, [{nodelay, true}]} ]}, {rabbit, [ {tcp_listen_options, [ {backlog, 4096}, {nodelay, true}, {linger, {true,0}}, {exit_on_close, false} ]} ]} ].Erlang VM I/O Thread Pool Tuning
Adequate Erlang VM I/O thread pool size is also important when tuning for a large number of concurrent connections. See the section above.
Connection Backlog
With a low number of clients, new connection rate is very unevenly distributed but is also small enough to not make much difference. When the number reaches tens of thousands or more, it is important to make sure that the server can accept inbound connections. Unaccepted TCP connections are put into a queue with bounded length. This length has to be sufficient to account for peak load hours and possible spikes, for instance, when many clients disconnect due to a network interruption or choose to reconnect. This is configured using the tcp_listen_options.backlog option:
tcp_listen_options.backlog = 4096 tcp_listen_options.nodelay = trueIn the classic config format:
[ {rabbit, [ {tcp_listen_options, [ {backlog, 4096}, {nodelay, true}, {linger, {true, 0}}, {exit_on_close, false} ]} ]} ].Default value is 128. When pending connection queue length grows beyond this value, connections will be rejected by the operating system. See also net.core.somaxconn in the kernel tuning section.
Dealing with High Connection Churn
Why is High Connection Churn Problematic?
Workloads with high connection churn (a high rate of connections being opened and closed) will require TCP setting tuning to avoid exhaustion of certain resources: max number of file handles, Erlang processes on RabbitMQ nodes, kernel's ephemeral port range (for hosts that open a lot of connections, including Federation links and Shovel connections), and others. Nodes that are exhausted of those resources won't be able to accept new connections, which will negatively affect overall system availability.
Due to a combination of certain TCP features and defaults of most modern Linux distributions, closed connections can be detected after a prolonged period of time. This is covered in the heartbeats guide. This can be one contributing factor to connection build-up. Another is the TIME_WAIT TCP connection state. The state primarily exists to make sure that retransmitted segments from closed connections won't "reappear" on a different (newer) connection with the same client host and port. Depending on the OS and TCP stack configuration connections can spend minutes in this state, which on a busy system is guaranteed to lead to a connection build-up.
See Coping with the TCP TIME_WAIT connections on busy servers for details.
TCP stack configuration can reduce peak number of connection in closing states and avoid resource exhaustion, in turn allowing nodes to accept new connections at all times.
High connection churn can also mean developer mistakes or incorrect assumptions about how the messaging protocols supported by RabbitMQ are meant to be used. All supported protocols assume long lived connections. Applications that open and almost immediately close connections unnecessarily waste resources (network bandwidth, CPU, RAM) and contribute to the problem described in this section.
Inspecting Connections and Gathering Evidence
If a node fails to accept connections it is important to first gather data (metrics, evidence) to determine the state of the system and the limiting factor (exhausted resource). Tools such as netstat, ss, lsof can be used to inspect TCP connections of a node. See Troubleshooting Networking for examples.
While heartbeats are sufficient for detecting defunct connections, they are not going to be sufficient in high connection churn scenarios. In those cases heartbeats should be combined with TCP keepalives to speed up disconnected client detection.
Reducing Amount of Time Spent in TIME_WAIT
TCP stack tuning can also reduce the amount of time connections spend in the TIME_WAIT state. The net.ipv4.tcp_fin_timeout setting specifically can help here:
net.ipv4.tcp_fin_timeout = 30Note that like other settings prefixed with net.ipv4., this one applies to both IPv4 and IPv6 connections despite the name.
If inbound connections (from clients, plugins, CLI tools and so on) do not rely on NAT, net.ipv4.tcp_tw_reuse can be set to 1 (enabled) to allow the kernel to reuse sockets in the TIME_WAIT state for outgoing connections. This setting can be applied on client hosts or intermediaries such as proxies and load balancers. Note that if NAT is used the setting is not safe and can lead to hard to track down issues.
The settings above generally should be combined with reduced TCP keepalive values, for example:
net.ipv4.tcp_fin_timeout = 30 net.ipv4.tcp_keepalive_time=30 net.ipv4.tcp_keepalive_intvl=10 net.ipv4.tcp_keepalive_probes=4 net.ipv4.tcp_tw_reuse = 1OS Level Tuning
Operating system settings can affect operation of RabbitMQ. Some are directly related to networking (e.g. TCP settings), others affect TCP sockets as well as other things (e.g. open file handles limit).
Understanding these limits is important, as they may change depending on the workload.
A few important configurable kernel options include (note that despite option names they are effective for both IPv4 and IPv6 connections):
| Kernel setting | Description |
|---|---|
| fs.file-max | Max number of files the kernel will allocate. Limits and current value can be inspected using /proc/sys/fs/file-nr. |
| net.ipv4.ip_local_port_range | Local IP port range, define as a pair of values. The range must provide enough entries for the peak number of concurrent connections. |
| net.ipv4.tcp_tw_reuse | When enabled, allows the kernel to reuse sockets in TIME_WAIT state when it's safe to do so. See Dealing with High Connection Churn. This option is dangerous when clients and peers connect using NAT. |
| net.ipv4.tcp_fin_timeout | Lowering this timeout to a value in the 15-30 second range reduces the amount of time closed connections will stay in the TIME_WAIT state. See Dealing with High Connection Churn. |
| net.core.somaxconn | Size of the listen queue (how many connections are in the process of being established at the same time). Default is 128. Increase to 4096 or higher to support inbound connection bursts, e.g. when clients reconnect en masse. |
| net.ipv4.tcp_max_syn_backlog | Maximum number of remembered connection requests which did not receive an acknowledgment yet from connecting client. Default is 128, max value is 65535. 4096 and 8192 are recommended starting values when optimising for throughput. |
| net.ipv4.tcp_keepalive_* | net.ipv4.tcp_keepalive_time, net.ipv4.tcp_keepalive_intvl, and net.ipv4.tcp_keepalive_probes configure TCP keepalive. AMQP 0-9-1 and STOMP have Heartbeats which partially undo its effect, namely that it can take minutes to detect an unresponsive peer, e.g. in case of a hardware or power failure. MQTT also has its own keepalives mechanism which is the same idea under a different name. When enabling TCP keepalive with default settings, we recommend setting heartbeat timeout to 8-20 seconds. Also see a note on TCP keepalives later in this guide. |
| net.ipv4.conf.default.rp_filter | Enabled reverse path filtering. If IP address spoofing is not a concern for your system, disable it. |
Note that default values for these vary between Linux kernel releases and distributions. Using a recent kernel (3.9 or later) is recommended.
Kernel parameter tuning differs from OS to OS. This guide focuses on Linux. To configure a kernel parameter interactively, use sysctl -w (requires superuser privileges), for example:
sysctl -w fs.file-max 200000To make the changes permanent (stick between reboots), they need to be added to /etc/sysctl.conf. See sysctl(8) and sysctl.conf(5) for more details.
TCP stack tuning is a broad topic that is covered in much detail elsewhere:
TCP Socket Options
Common Options
| Kernel setting | Description |
|---|---|
| tcp_listen_options.nodelay | When set to true, disables Nagle's algorithm. Default is true. Highly recommended for most users. |
| tcp_listen_options.sndbuf | See TCP buffers discussion earlier in this guide. Default value is automatically tuned by the OS, typically in the 88 KiB to 128 KiB range on modern Linux versions. Increasing buffer size improves consumer throughput and RAM use for every connection. Decreasing has the opposite effect. |
| tcp_listen_options.recbuf | See TCP buffers discussion earlier in this guide. Default value effects are similar to that of tcp_listen_options.sndbuf but for publishers and protocol operations in general. |
| tcp_listen_options.backlog | Maximum size of the unaccepted TCP connections queue. When this size is reached, new connections will be rejected. Set to 4096 or higher for environments with thousands of concurrent connections and possible bulk client reconnections. |
| tcp_listen_options.keepalive | When set to true, enables TCP keepalives (see above). Default is false. Makes sense for environments where connections can go idle for a long time (at least 10 minutes), although using heartbeats is still recommended over this option. |
Defaults
Below is the default TCP socket option configuration used by RabbitMQ:
- TCP connection backlog is limited to 128 connections
- Nagle's algorithm is disabled
- Server socket lingering is enabled with the timeout of 0
Heartbeats
Some protocols supported by RabbitMQ, including AMQP 0-9-1, support heartbeats, a way to detect dead TCP peers quicker. Please refer to the Heartbeats guide for more information.
Net Tick Time
Heartbeats are used to detect peer or connection failure between clients and RabbitMQ nodes. net_ticktime serves the same purpose but for cluster node communication. Values lower than 5 (seconds) may result in false positive and are not recommended.
TCP Keepalives
TCP contains a mechanism similar in purpose to the heartbeat (a.k.a. keepalive) one in messaging protocols and net tick timeout covered above: TCP keepalives. Due to inadequate defaults, TCP keepalives often don't work the way they are supposed to: it takes a very long time (say, an hour or more) to detect a dead peer. However, with tuning they can serve the same purpose as heartbeats and clean up stale TCP connections e.g. with clients that opted to not use heartbeats, intentionally or not.
Below is an example sysctl configuration for TCP keepalives that considers TCP connections dead or unreachable after 70 seconds (4 attempts every 10 seconds after connection idle for 30 seconds):
net.ipv4.tcp_keepalive_time=30 net.ipv4.tcp_keepalive_intvl=10 net.ipv4.tcp_keepalive_probes=4TCP keepalives can be a useful additional defense mechanism in environments where RabbitMQ operator has no control over application settings or client libraries used.
Connection Handshake Timeout
RabbitMQ has a timeout for connection handshake, 10 seconds by default. When clients run in heavily constrained environments, it may be necessary to increase the timeout. This can be done via the rabbit.handshake_timeout (in milliseconds):
handshake_timeout = 20000It should be pointed out that this is only necessary with very constrained clients and networks. Handshake timeouts in other circumstances indicate a problem elsewhere.
TLS (SSL) Handshake
If TLS/SSL is enabled, it may necessary to increase also the TLS/SSL handshake timeout. This can be done via the rabbit.ssl_handshake_timeout (in milliseconds):
ssl_handshake_timeout = 10000Hostname Resolution and DNS
In many cases, RabbitMQ relies on the Erlang runtime for inter-node communication (including tools such as rabbitmqctl, rabbitmq-plugins, etc). Client libraries also perform hostname resolution when connecting to RabbitMQ nodes. This section briefly covers most common issues associated with that.
Performed by Client Libraries
If a client library is configured to connect to a hostname, it performs hostname resolution. Depending on DNS and local resolver (/etc/hosts and similar) configuration, this can take some time. Incorrect configuration may lead to resolution timeouts, e.g. when trying to resolve a local hostname such as my-dev-machine, over DNS. As a result, client connections can take a long time (from tens of seconds to a few minutes).
Short and Fully-qualified RabbitMQ Node Names
RabbitMQ relies on the Erlang runtime for inter-node communication. Erlang nodes include a hostname, either short (rmq1) or fully-qualified (rmq1.dev.megacorp.local). Mixing short and fully-qualified hostnames is not allowed by the runtime. Every node in a cluster must be able to resolve every other node's hostname, short or fully-qualified.
By default RabbitMQ will use short hostnames. Set the RABBITMQ_USE_LONGNAME environment variable to make RabbitMQ nodes use fully-qualified names, e.g. rmq1.dev.megacorp.local.
Reverse DNS Lookups
If the reverse_dns_lookups configuration option is set to true, RabbitMQ will perform reverse DNS lookups for client IP addresses and list hostnames in connection information (e.g. in the Management UI).
Reverse DNS lookups can potentially take a long time if node's hostname resolution is not optimally configured. This can increase latency when accepting client connections.
To explicitly enable reverse DNS lookups:
reverse_dns_lookups = trueTo disable reverse DNS lookups:
reverse_dns_lookups = falseVerify Hostname Resolution on a Node or Locally
Since hostname resolution is a prerequisite for successful inter-node communication, starting with RabbitMQ 3.8.6, CLI tools provide two commands that help verify that hostname resolution on a node works as expected. The commands are not meant to replace dig and other specialised DNS tools but rather provide a way to perform most basic checks while taking Erlang runtime hostname resolver features into account.
The first command is rabbitmq-diagnostics resolve_hostname:
# resolves node2.cluster.local.svc to IPv6 addresses on node rabbit@node1.cluster.local.svc rabbitmq-diagnostics resolve_hostname node2.cluster.local.svc --address-family IPv6 -n rabbit@node1.cluster.local.svc # makes local CLI tool resolve node2.cluster.local.svc to IPv4 addresses rabbitmq-diagnostics resolve_hostname node2.cluster.local.svc --address-family IPv4 --offlineThe second one is rabbitmq-diagnostics resolver_info:
rabbitmq-diagnostics resolver_infoIt will report key resolver settings such as the lookup order (whether CLI tools should prefer the OS resolver, inetrc file, and so on) as well as inetrc hostname entries, if any:
Runtime Hostname Resolver (inetrc) Settings Lookup order: native Hosts file: /etc/hosts Resolver conf file: /etc/resolv.conf Cache size: inetrc File Host Entries (none)Connection Event Logging
See Connection Lifecycle Events in the logging guide.
Troubleshooting Network Connectivity
A methodology for troubleshooting of networking-related issues is covered in a separate guide.
MacOS Application Firewall
On MacOS systems with Application Firewall enabled, Erlang runtime processes must be allowed to bind to ports and accept connections. Without this, RabbitMQ nodes won't be able to bind to their ports and will fail to start.
A list of blocked applications can be seen under Security and Privacy => Firewall in system settings.
To "unblock" a command line tool, use sudo /usr/libexec/ApplicationFirewall/socketfilterfw. The examples below assume that Erlang is installed under /usr/local/Cellar/erlang/{version}, used by the Homebrew Erlang formula:
# allow CLI tools and shell to bind to ports and accept inbound connections sudo /usr/libexec/ApplicationFirewall/socketfilterfw --add /usr/local/Cellar/erlang/{version}/lib/erlang/bin/erl sudo /usr/libexec/ApplicationFirewall/socketfilterfw --unblockapp /usr/local/Cellar/erlang/{version}/lib/erlang/bin/erl # allow server nodes (Erlang VM) to bind to ports and accept inbound connections sudo /usr/libexec/ApplicationFirewall/socketfilterfw --add /usr/local/Cellar/erlang/{version}/lib/erlang/erts-{erts version}/bin/beam.smp sudo /usr/libexec/ApplicationFirewall/socketfilterfw --unblockapp /usr/local/Cellar/erlang/{version}/lib/erlang/erts-{erts version}/bin/beam.smpNote that socketfilterfw command line arguments can vary between MacOS releases. To see supports command line arguments, use
sudo /usr/libexec/ApplicationFirewall/socketfilterfw --helpGetting Help and Providing Feedback
If you have questions about the contents of this guide or any other topic related to RabbitMQ, don't hesitate to ask them on the RabbitMQ mailing list.
Help Us Improve the Docs <3
If you'd like to contribute an improvement to the site, its source is available on GitHub. Simply fork the repository and submit a pull request. Thank you!
What’s New in the TCP Manager 1.0 serial key or number?
Screen Shot

System Requirements for TCP Manager 1.0 serial key or number
- First, download the TCP Manager 1.0 serial key or number
-
You can download its setup from given links:

TCP Manager 1.0 serial key or number & Serial Key Download

TCP Manager 1.0 serial key or number& Kali Software Crack
