
Driver xp keygen

Driver xp keygen
HW VSP3 - Virtual Serial Port
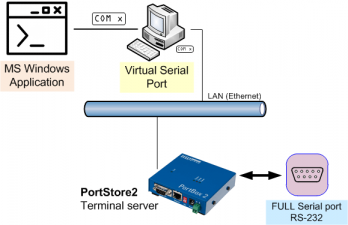
HW VSP is a software driver that adds a virtual serial port (e.g. COM5) to the operating system and redirects the data from this port via a TCP/IP network to another hardware interface, which is specified by its IP address and port number. HW VSP3 support even NT Services and 64 bit Windows 8 .
- Free, unrestricted Virtual Serial Port driver for any TCP/IP devices
- Compatible with Windows 2000, XP, Windows 8, Windows 8 NEW& even 32-bit or 64 bit.
- Runs as a standalone application, or as a NT service suitable for servers
- Option to start at Windows startup and minimize to System Tray
- Single-port (free) and multi-port (commercial) version
- Supports RFC 2217, allowing to change remote serial port parameters (such as speed, parity, stop bits) over TCP using NVT
- VSP driver typically operates as a “TCP client”; however, it can also be used as a “TCP server” (useful for GPRS applications)
- Configuration stored in an INI file
- Configuration protected with a password
- Supports UAC (User Account Control)

- Using devices connected via RS-232 with legacy SW, no need to change existing utilities
- Remote PBX management – PBX billing / accounting
- Connecting payment terminals
- Wireless remote serial port – through WiFi
- UPS supervision over SNMP or with proprietary SW
- Connecting a barcode reader to existing SW
- Connecting serial printers and labelers
- Remote control of industrial assembly lines, visualization
New in HW VSP3
 Single-port and multi-port version:
- Single-port version of HW VSP3 is available freely
- Multi-port version is available only for HW group products
- Runs as a stand-alone application, or as a NT service suitable for servers
- Complete support for Windows 8 and Windows 10
- Supports all 32-bit or 64-bit Windows systems, including Server versions
- Configuration is stored in an INI file for easy backup or transfer to another PC
- Automatically connects to a previously opened serial port
- Receive buffer cleared when a port is opened
- In the service mode, both versions run as a client/server application allowing you to create, reconfigure and remove virtual ports remotely using a client-side part of VSP – useful for multi-port applications
- Supports UAC (User Account Control)
- VSP in TCP server mode uses 0.0.0.0 as a pre-entered IP address
- Baudrate emulation - when no flow control is available
Description of HW VSP3
 HW Virtual Serial Driver is intended primarily for devices produced by HW group, although it can be used for free as a universal driver that creates a virtual remote serial port, which redirects data to a predefined TCP/IP address and port.
In special applications (e.g. involving GPRS devices), the PC with the HW VSP driver can be set to operate in TCP Server mode, enabling the remote device to initialize the connection by sending any data to the remote port. Upon receiving RS-232 data, the converter establishes a connection with the PC and passes the data to the virtual COM port. Therefore, the scenario very closely resembles behavior of a real serial port.
When using HW VSP together with recommended devices produced by HW group, it is possible to change connection speed, parity, and other communication parameters (as well as to control any digital outputs and inputs) remotely on the fly via the RFC-2217 protocol, thus achieving a true remote serial port behavior.
Running as a NT service / in client-server mode
Ability to run as a service has been the main reason for developing the new version. Running HW VSP as a standalone application requires starting it under a logged-in user and therefore prevents autonomous operation on Windows servers. (At this time, HW VSP fully supports Windows 2000 Server and Windows 2003 Server. Support for Windows 2008 Server is being tested.) In this mode, HW VSP consists of a client-side part (setup GUI) and a server-side part (the service itself). Parameters of a VSP running on a remote server can be easily changed from a local PC. However, in order to improve stability, only one user may access the service and change virtual port parameters at a time. Furthermore, since service administration requires administrator privileges, securing a VSP against misuse is as simple as not installing the client-side part.
Note: From the user point of view, using HW VSP in service mode has many advantages. However, on Windows XP SP2/Vista/2003 Server, it is necessary to manually configure the firewall to enable the appropriate communication ports or the entire application (by default Program Files\HW group\HW VSP3s\HW_VSP3s_srv.exe for the single-port version and Program Files\HW group\HW VSP3\HW_VSP3_srv.exe for the multi-port one). Firewall dialog control is currently under development.
Baudrate emulation
In the previous version, HW VSP was fully transparent to the client software and did not restrict the communication flow in any way. Hence, the client SW had to send the data to the serial port using a defined communication speed, or use flow control (handshake). Otherwise, data were sent to the Ethernet / Internet with the maximum speed possible, often in the 10 Mbps range. When the buffers in VSP filled up, data started to be thrown away. Now, it is possible to enable the Strict Baudrate Emulation option in the Settings tab to ensure that VSP communicates with the client SW using the speed that is currently selected for the port.
Note: The Strict Baudrate Emulation option is only available when connected to HW group devices and with NVT support enabled.
Purging transmit and receive buffers
The option allows to clear Ethernet receive and transmit buffers when the port is opened. This ensures that the client application does not receive any previously received data (e.g. sent in a previous session) that could cause problems.
Automatic connection to previously opened port
This function allows connecting VSP to the port previously created and opened by the client application. This function is useful for servers, where it eliminates the need to close the corresponding virtual port before restarting server or the VSP service.
Configuration stored in an INI file
With the introduction of the multi-port version, VSP configuration is now stored in an INI file instead of the system registry. Therefore, configuration can be easily backed up or restored to another PC or server simply by copying the file and restarting the service. The INI file contains a complete VSP configuration, enabling the user to create a custom graphical interface to generate the INI file. Upon restarting the service, the INI file is loaded and the port parameters are changed - no need to study the complexities of controlling services. WC VSP for WirelesCOM is an example of such a customized application.
Works with Windows 8
HW VSP 3 now fully supports the Windows 8. UAC (user switching) support is also fully functional now, including functionality in a domain. When HW VSP is run as a service, all users can control it.
Installing HW VSP3
HW VSP 3 is freeware; you can download it free of charge HERE. The software is available in a single-port and multi-port version (development is in the final stage now). Installation is straightforward, except for Windows Vista, where it is necessary to allow the installer to elevate its privileges.
 Installation procedure:
- Run the “HW VSP Setup 3.0.23 single.exe” installation program.
- Step 1: The welcome screen is displayed. Click “Next” to proceed to the next step of the installation, or click “Back” to return to the previous step.
- Step 2: The basic product information is displayed.
- Step 3: Select the location where to install the driver.
- Select installation type – Client-Server / Standalone or Custom.
- Step 4: Choose a name for the folder to create in the Start menu.
- Step 5: Select whether you want to create a shortcut on the Desktop.
- Step 6: The entered data are displayed for verification.
- Step 7: Confirm the installation.
- Step 8: HW VSP will prompt you to agree with adding HW VSP to the list of exceptions for Windows Firewall. Permission is necessary for correct operation. If you deny the permission, you will have to add the application and the service to the list of exceptions manually.
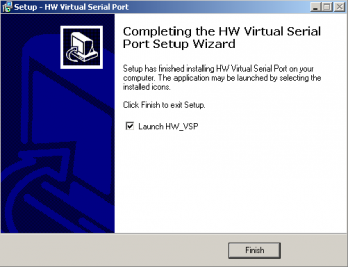
 If the installation is successful, the following window appears. If you check the “Launch HW_VSP” box, the program is started after completing the installation. It is not necessary to restart the computer after the installation. You can start HW VSP by clicking the “VSP” icon (icon with a red arrow).
Note: When installing HW VSP in Client/Server mode or using it in the Server mode on Windows XP SP2/Vista/2003 Server,it is necessary to manually configure the firewall to enable the appropriate communication ports or the entire service (by default Program Files\HW group\HW VSP3s\HW_VSP3s_srv.exe for the single-port version and Program Files\HW group\HW VSP3\HW_VSP3_srv.exe for the multi-port version). Firewall dialog control is currently under development.
Configuring the connected device
Before connecting to the VSP, it is necessary to configure the remote device according to its manual. If you use one of our devices, make sure to check the following parameters.
Most important parameters:
- IP address of the remote device
- IP port
- Gateway
- Mask
- TCP/IP mode - TCP Server / Passive mode
- Network Virtual Terminal (NVT) - On (only for recommended HWg devices)
- Serial port parameters
Security
All configuration settings in HW VSP3 are password-protected. To enter the password, press the Login button. The default password is "admin". You can change your password with the HW_VSP3s_passwd.exe application that is available at Program Files\HW group\HW VSP3s\.
UDP Search
Run HW VSP and switch to “UDP Search” tab. After clicking Search modules, the Modules MAC List displays a list of devices found in the local network segment.
Click Use this IP to set the IP address and the incoming port number of the selected device as the current device address for HW VSP to work with.
Virtual Serial Port
The main tab displays basic information about establishing the connection and its progress. Here you can create or delete a virtual serial port using the “Create COM” and “Delete COM” buttons respectively.
Click “Show Log” to display the program log that can simplify troubleshooting.
- VSP pane
List of serial port settings.- LAN pane
Displays Ethernet connection status.- Counters pane
Volume of the data transferred and requests queued.
- IP Address
IP address of the remote serial port. The value can be taken automatically from the UDP tab.
- Port
Incoming port of the remote serial port device. Your PC opens the TCP/IP connection and sends data to this port.
Port Name
Number of the Virtual Serial Port being created – select a port number from COM2 to COM20.- External NVT Commands Port
HW VSP opens the specified TCP port on your PC, where it receives NVT control commands for controlling I/O pins and passes them over the connection to the remote device.
For example, a proprietary utility processes barcode data and your program (e.g. the HWg SDK example) controls I/O pins through VSP and the specified port – see the Block diagram.
If you need to create more virtual serial ports on a single PC, you can use the multi-port version of HW VSP.
Settings
The “Settings” tab allows you to set up all functions supported by the virtual serial port.
Caution: These settings apply to the HW VSP utility only. They do NOT influence the remote device. Remote device properties are set according to its manual (e.g. via the Hercules utility in case of HW group products).
- Log files enabled
Logs all communication to a .log file.- Create VSP Port at HW VSP startup
If this box is checked, all virtual ports are recreated when HW VSP is started.- TCP Server Mode
Activates VSP as a TCP/IP server. The driver then behaves as a TCP Client/Server device - this means that the first party to receive any data switches over to Client mode and establishes the connection. In the TCP server mode, IP address is automatically preset to 0.0.0.0 and TCP port is set to current COM port number + 3000 (e.g. COM3 = TCP port 3003). The port can be changed. Pay attention to the firewall settings!- Purge Buffers when Port is Opened
Clears transmit and receive buffers upon opening the port. This ensures that no leftover data from a previous session are sent or received. However, this also deletes any data received before the port is opened (e.g. during PC startup).- Connect to device even if VSP Port is closed
If this box is checked, the connection is established immediately after the virtual port is created, even if no application is using the port. As a result, data sent when the port was open but unused will be lost. The device sends data even if you don’t “listen” for them.- Use NOP to Keep Connection
+ Renew automatically
Expects a testing NOP to check for module presence. If a module was unreachable and is rediscovered (starts to respond again), the connection is reestablished either immediately (“Renew automatically” checked), or as soon as VSP sends new data to the TCP socket (“Renew automatically” unchecked).- NVT
Click “NVT Enable” to enable RFC2217 support and detection of our remote ports. Remember to activate NVT support on the corresponding device as well. After activating NVT commands, it is possible to activate the following parameters in the same way:
- Remote port setup – sends control information to the remote port according to VSP settings on your PC. If your terminal software (e.g. Hyperterminal) changes the baudrate to 19200Bd and this feature is active, the VSP driver sends a NVT command (according to the RFC2217 standard) to the remote TCP/IP serial port and changes its baudrate, too.
- Keep Connection – your TCP device closes an open TCP/IP connection after 50 seconds of inactivity. This function lets you keep the connection open (transfers 2 bytes every 5 seconds).
- Strict Baudrate Emulation
Limits the application-to-VSP and TCP-to-VSP transfer rate according to the baudrate of the open serial port.- Save Settings to INI file
Saves current configuration in the INI file.
Advanced
Connection to Service
Allows you to specify whether the GUI connects to the service running on the same PC, or change IP ports for the communication.
- Local Machine – it is possible to change the port number for the GUI to service communication, e.g. in case of conflicts.
- Remote Machine – Allows the client software to connect to a remote service, e.g. in situations where Remote Desktop is not available or suitable.
- Reconnect
Reestablishes the connection of the client interface to the running service, e.g. when the connection is lost, or establishes the connection of the local client portion to a remote service that runs for instance on a server.- Report VSP Setting
Displays current configuration of the remote device (if TCP Setup is enabled on the device using the standard port 99).- Show Log
Displays a logfile of VSP3 activity.
License – Distribution and Usage Conditions
 Even though a license fee is not paid for the use of the Freeware Version software, it does not mean that there are no conditions for using such software:
The Licensee will not have any proprietary rights to the Software. The Licensee acknowledges and agrees that the Licensor retains all copyrights and other proprietary rights in and to the Software.
The Licensee must reproduce all copyright notices and any other proprietary legends on any copy of the Software.
The Licensee may not disassemble, reverse-engineer, modify or alter in any way the installer program without the Licensor’s specific approval. The Licensee is not authorized to use any plug-in or enhancement that permits to save modifications to a file with the Software licensed and distributed by the Licensor.
- The Software under this License may contain the components developed by third-parties. The structure, organization and code of such components are the valuable trade secrets and confidential information of the third-party and are protected by copyright and third-party license agreement. The Licensee may not:
- 4.1 incorporate such third-party components into software and hardware, developed by the Licensee, without the third-party’s special permission;
- 4.2 provide such third-party components to accompany software and hardware, sold by the Licensee, without the third-party’s special permission.
- Private & Commercial license of HW VSP
- 5.1 Private use license
There are no restrictions to use and distribution of this software by private individuals; however, we kindly ask that you add a link to your website (or blog) that points to our website, www.HW-group.com, preferably in the form shown below. - 5.2 Commercial license
Organizations and other legal entities may use and distribute this software only if they display a link to the http://www.HW-group.com named as “Using HW VSP powered by HW group” on the website on the company or if they receive authorisation from HW group in written form.
- 5.1 Private use license
If you distribute the software without publishing the link as described, you violate our copyright and we may take legal action against you.
Hardware (USB) licence key
PROMOTIC hardware key (further refered to as "HW Key") is used for protection of the PROMOTIC system and for the protection of the designer's "know how". The complete information regarding the purchased licence is burned into the key. The HW Key is the most commonly used licence carrier.
Each PROMOTIC HW Key is labeled by 4-digits number that identifies the licence number. This number can be found on the white label that is attached on the HW Key. The information regarding the connected key can be obtained in the runtime mode by the Pm.LicenceInfo method, or in the INFO system of running application - /SYSTEM/Licence tab.
The PROMOTIC system uses SENTINEL licence keys by the SafeNet Ltd company. When ordering a PROMOTIC licence several different key types can be choosen: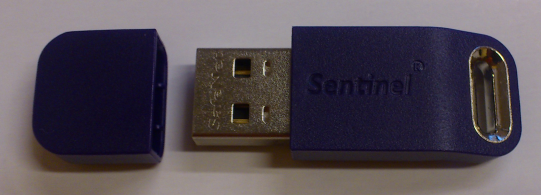

 According to the licence content we distinguish 2 types of PROMOTIC licence keys:
 hinstall.exe - Hardware key drivers
For the correct behavior of the HW Key it is necessary to set parameters that can be changed by the hinstall.exe program (it can be launched from the cmd command line) that is located in the \Promotic\Tools\HwKey folder.The PROMOTIC installation program sets these parameters automatically but in special cases it is possible to change the parameters by the user.
Caution in OS Windows Vista, 7, Server 2008 it is necessary to run as Administrator
The basic commands of the program:Known problems with the installation of the HW Key driver
The reason is insufficient permision of the logged-in client for computer hardware access. This also concerns the driver that is used for HW Key access.
The PROMOTIC system cannot be installed in this mode.
Compatibility table OS Windows and PROMOTIC version
The following overview indicates the compatibility of PROMOTIC version with OS Windows version. Installation of HW Key drivers is a part of the PROMOTIC system installation. This way the application can accesss the content of the HW Key via the driver. There may be problems in situation when an older PROMOTIC version is installed on a new OS Windows that was not known at the time the PROMOTIC version was released.| 32/64 bit OS Windows | |||||||
|---|---|---|---|---|---|---|---|
| PROMOTIC | 98, ME | XP | XP embed | Vista, Server 2003 | 7, 7 embed | 10 | Server 2008 - 2019 |
| version <= 6(SP14f) | Yes | Yes | Yes | - | - | - | - |
| version <= 7.3.8 | Yes | Yes | Yes | - | - | - | - |
| version >= 7.3.9 | - | Yes | Yes | Yes (*) | Yes (*) | Yes (*) | Yes (*) |
| version <= 8.0.13 | - | Yes | Yes (**) | Yes (*) | Yes (*) | Yes (*) | Yes (*) |
| version <= 8.1.13 | - | Yes | Yes (**) | Yes (*) | Yes (*) | Yes (*) | Yes (*) |
| version <= 8.2.23 | - | Yes | Yes (**) | Yes (**) | Yes (**) | Yes (**) | Yes (**) |
| version <= 8.3.25 | - | Yes (^) | Yes (^)(**) | Yes (**) | Yes (**) | Yes (**) | Yes (**) |
| version >= 8.3.25 | - | Yes (***) | Yes (***) | Yes (***) | Yes (**) | Yes (**) | Yes (**) |
| version >= 9.0.0 | - | - | - | (***) | Yes (**) | Yes (**) | Yes (**) |
(*) = only with new HW key driver - Driver HASP
(**) = OS Windows may require newer version of HW key - Sentinel Driver
(***) = Installed PROMOTIC version includes the installer of hardware key driver that is not compatible with this version of OS Windows. It is necessary to (manually) install an older version of the driver. - Driver HASP
(^) = The installation may require higher version of Windows installer - Windows Installer
Recommendation:If the older Promotic version is installed on newer OS Windows and the HW Key driver provided with PROMOTIC is not functional, then:
Running the installer of HW Key driver with parameter -?, for example: hinstall.exe -? will indicate the version of the driver that is contained in such installer.
History:
Permanent Method to Crack WGA and Patch Windows XP (inc MCE) or 2003 as Genuine
winxpwgapatch

There is a lot of cracks or patches or fixes that aims to bypass or skip Windows Genuine Advantage (WGA) validation process, or trick the WGA validation results to be always genuine. However, these workarounds do not address the fundamental issue of the problem - that’s the product CD key or volume license key (VLK) registered in your copy of Windows XP, Windows XP Media Center Edition (MCE) and Windows Server 2003 is invalid or has been blocked or banned by Microsoft. The following ultimate WGA Patcher Permanent Kit with cracks and procedures all-in-one package will convert and transform the pirated Windows operating system into genuine and legitimate OS when validate by Microsoft’s WGA, by changing the serial number, product key or VLK of the Windows with a valid CD key, and when necessary, apply patch.
- Download (link removed due to complaint from Microsoft) or (download removed due to complaint from Microsoft) which contains Magical Jelly Bean Keyfinder v1.51 (keyfinder.exe), Microsoft Genuine Advantage Diagnostics Tool 1.5.0717.0 (MGADiag.exe), wga-hosts-fix 0.1 (wga-fix.exe), and Windows XP, Windows Server 2003 VLK key generator (MSKey.exe or Windows XP Keygen.exe).
- Extract the zip file.
- Run the Windows XP/2003 key generator (MSKey.exe or Windows XP Keygen.exe).
- In the key generator, under the Product Family, select “Windows XP Pro. VLK”, and click the “Generate” button to generate a valid and genuine serial key for Windows XP (choose Windows Server 2003 VLK for Windows 2003). If key generator doesn’t work, try to find a product key on web.
- Note down the product key or serial that is generated (can leave the program opens). The idea is to get VLK key that yet to be blocked or unknown to Microsoft.
- Execute Magical Jelly Bean Keyfinder (keyfinder.exe). If you having problem with Keyfinder, you can use any other Windows key changer listed here, such as RockXP and KeyFinder Thing.
- Once launched, Magical Jelly Bean Keyfinder will display the existing Windows and Office product key in the system. Select “Microsoft Windows” tab (open by default), and click on Options menu, and then select “Change Windows Key”.
- In the Change Microsoft Windows XP Key window, key in the product key or serial number generated from the keygen program in the boxes.
- Click on Change button when done.
- Magical Jelly Bean Keyfinder will use Microsoft’s WMI script to change the product key of Windows XP. Follow on screen instruction to continue.
- Run wga-fix.exe program. Click on Yes button on the ‘wga-host-fix 0.1 window’ to redirect WGA authorization and validation request to loopback address (127.0.0.1). Alternatively, open Command Prompt, and navigate to \Windows\System32\drivers\etc\ directory, edit the Hosts file, and add in the following entry to the end of the file:127.0.0.1 mpa.one.microsoft.com
- Uninstall or delete any cracked or patched LegitControlCheck.dll, WgaTray.exe and WgaLogon.dll located in \Windows\System32 folder. You may also need to delete “Windows Genuine Advantage Validation Tool” located in C:\Windows\Downloaded Program Files\ folder.
- Go to Windows (Microsoft) Updates or Microsoft Download Center to download updates or applications in which require validation. Install WGA Validation Tool ActiveX when prompted. (Note: If you’re having problem to validate Windows with MGADiag.exe in later process, you still skip previous and this step first or apply the patched LegitCheckControl.dll again, which means leave the patch and crack intact, and only come back to delete any crack or patch, and install original WGA validation tool later. This especially true if you have LegitCheckControl.dll 1.5.723.1 with MGDIAG.exe 1.5.0717.0)
- Run the Microsoft Microsoft Genuine Validation Diagnostic Tool (MGADiag.exe), and click on Continue button to proceed.
- Click on OK when MGADiag finishes processing and displays your genuine status. The status should show GENUINE, and not NOT ACTIVATED.
Step 6 - 10 can also be done without using any hacker tool, by using Activation Wizard following official tutorial from Microsoft on how to change the Volume Licensing product key on a computer that is running Windows XP SP1 and later versions of Windows XP detailed as below.
- Click Start, and then click Run.
- In the Open box, type regedit, and then click OK.
- In the left pane, locate and then click the following registry key:HKEY_LOCAL_MACHINE\Software\Microsoft\WindowsNT\Current Version\WPAEvents
- In the right pane, right-click OOBETimer, and then click Modify.
- Change at least one digit of this value to deactivate Windows.
- Click Start, and then click Run.
- In the Open box, type the following command, and then click OK.%systemroot%\system32\oobe\msoobe.exe /a
- Click Yes, I want to telephone a customer service representative to activate Windows, and then click Next.
- Click Change Product key.
- Type the new product key in the New key boxes, and then click Update. If you are returned to the previous window, click Remind me later, and then restart the computer.
- Repeat steps 6 to verify that Windows is activated. You receive the following message:Windows is already activated. Click OK to exit.
Shortcut to Genuine Windows without Any Crack
Unable to download the crack? Or afraid that the cracks of keygen and key changer contains virus or trojan? You can simply add in the entry in step 11 (i.e. 127.0.0.1 mpa.one.microsoft.com) into your Hosts file if VLK key of your Windows installation has PID within the range of -640 to -641 or any other volume license product key that is not blocked. You can try it anyway no matter what product key you used to see if it working with existing CD key without changing the key.
Note: This shortcut by using wga-fix.exe or manually editing the Hosts file should works out of the box immediately on Windows XP Media Center Edition (MCE) 2005 and Windows XP Tablet PC Edition, and by luck on Windows XP Home, XP Professional and Windows 2003.
- Simply remove and delete the crack or patch that has been applied in \Windows\System32 (LegitCheckControl.dll, WgaLogon.dll, WgaTray.exe) or \Documents and Settings\All users\Application Data (sub-folders “Windows Genuine Advantage” and “Office Genuine Advantage”)
- Go to Windows (Microsoft) Updates or Microsoft Download Center to access Windows updates or download applications that require validation. Install WGA Validation Tool ActiveX when prompted.
- Add in the “127.0.0.1 mpa.one.microsoft.com” to the Hosts file located in \Windows\System32\drivers\etc\ folder. Or alternatively, just execute (download link removed due to complaint from Microsoft) contained in the WGA crack archive package.
- Run MGADiag.exe to validate the Windows is genuine.
After applying this trick or hack, Microsoft WGA Validation Tool will treat the Windows as genuine, as in you legally purchase and buy the Windows OS. Users can access to Windows Updates or Microsoft Updates, download WGA validation required software products from Microsoft Download Center such as as Windows Defender, WMP11, IE7, DirectX and etc, and also to install these programs with proper validation without any cracks. This hack or trick should works on Windows XP, Windows XP Media Center Edition (MCE), and even Windows Server 2003, and users can pick any browsers they like, including IE6, IE7, Firefox, Netscape or web browser powerd by IE such as MSN Explorer or AOL Explorer.
If you still having problem with this method, try out other WGA bypass methods.
Disclaimer: This article is for educational and informational purpose only. If you’re having problem with your Windows validation, contact Microsoft.
What’s New in the Driver xp keygen?
Screen Shot

System Requirements for Driver xp keygen
- First, download the Driver xp keygen
-
You can download its setup from given links:


