
3D World Map v2.0 serial key or number

3D World Map v2.0 serial key or number
Lecture 17 - Google Maps
In this lecture, we learn how to incorporate Google Maps into applications - this is very cool. We have all used Google Maps on laptop browsers and smartphones but only as user up until now.
We will first learn how to install the Android Google Maps v2.0 environment. Then through two simple demos apps we get a sense of the main programming features needed to construct and control maps. I even named a demo app after the city recently described by New York Times journalist Neil MacFarquhar as a "drab industrial city". Cheers Neil - I was born and brought up in the hip, bustling, vibrant town of Coventry. You clearly now "darb" when you see it Neil. I digress. Now we transition from one Android aka Neil to another.
What this lecture will teach you
- How to Install the Google Maps 2.0 environment.
- I Am Here app.
- Coventry Demo app (dedicated to Neil MacFarquhar)
Demo projects
The demo code used in this lecture include:
- We will use the i_am_here.zip app to demonstrate how to display a single map and update it as we move. This app can track you as you move around and put a marker on the map of your current location.
- We also use the coventrydemo.zip app which allows the user to interact with the map by placing markers on the map and then connecting up the markers with polylines drawn on the map. A polyline is a list of points, where line segments are drawn between consecutive points.
The Coventry demo is take from here: detect MarkerClick and add Polyline The app detects long click on map and adds a marker. Lines can be drawn between markers using polylines.
These two apps will provide the necessary background to implement maps for [MyRuns4](http://www.cs.dartmouth.e
Note, that when you download the i_am_here.zip and coventrydemo.zip demo apps you will need to replace the Google MAP API key in the Manifest (which is mine) with your own key. These apps will not work if you do not do that. Instructions to do this are given Step 2 below.
Resources
Some excellent references.
How to Install the Google Maps 2.0 environment
The detailed process of creating a new Android application that uses the Google Maps Android API v2 requires several steps. In what follows we provide a more truncated set of steps with some screen dumps to help you along
Many of the steps outlined in this section will only have to be performed once, but some of the information will be a handy reference for future applications. The overall process of adding a map to an Android application is as follows:
- download and configure the Google Play services SDK; the Google Maps Android API is distributed as part of this SDK. Note, the Play plays (forgive the pun) a large role in publishing an app and we will discuss that towards the end of the course.
- Obtain an API key for Google Maps v2.0: to do this, you will need to register a project in the Google APIs Console, and get a signing certificate for your app.
- Specify settings in the Application Manifest: to do this you will need to add the dynamically created key to you Manifest file
- Add a map to a new or existing Android project: to do this you need to add a path to the Google Map APIs you download.
You have to do step 1 only once for your Eclipse environment. You have to do steps 2-4 for each new project that uses maps. I'll repeat this and paraphrase: for each new project that uses Google Map v2.0 you have to get a new key using the Google APIs Console; then insert that key into your manifest, and finally, you have to add the path to the Google Map library into the new project.
OK. That is the summary of how you do steps 1-4. Now let's provide more details with some illustrative screen dumps.
STEP 1: Install Google Play services
The API is distributed as part of the Google Play services SDK, which you can download with the Android SDK Manager. To use the Google Maps Android API v2 in your app, you will first need to install the Google Play services SDK. To learn how to install the package, see the Google Play services documentation for full details.
We need to install Google Play to get Google Maps and other parts of the SDK; you need to:
- Launch the SDK Manager. From Eclipse (with ADT), select Window > Android SDK Manager.
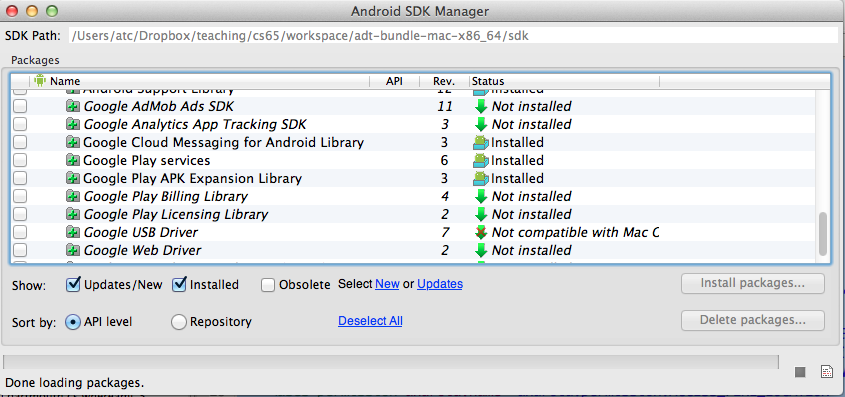
- Scroll to the bottom of the package list, select Extras > Google Play services, and install it (see figure below). The Google Play services SDK is saved in your Android SDK environment at
- Copy the
STEP 2: Obtain an API key for Google Maps v2.0
Obtaining a key for your application requires several steps. These steps are outlined here, and described in detail in the following sections.
- Retrieve information about your application's certificate.
- Register a project in the Google APIs Console and add the Maps API as a service for the project.
- Get a new key.
Retrieve information about your application's certificate
The Maps API key is based on a short form of your application's digital certificate, known as its SHA-1 fingerprint. Google Maps uses SHA-1 fingerprint in combination with the project name as a way to identify your application.
To display the SHA-1 fingerprint for your certificate, first ensure that you have the certificate itself. To obtain a SHA-1 fingerprint for your certificate read this or if you don't like reading the details follow these instructions:
We use the keytool command to generate a debug signing certificate. To do this open a terminal on your mac (sorry windows people) and issue the following command:
You should get the following output with the embedded SHA1: 65:24:35:7B:14:72:FC:B7:35:EF:A9:2E:01:3D:EA:41:E9:67:40:A4
The output from keytool should be:
If it fails, sorry you have to read the information above. One issue could be how to find ~/.android/debug.keystore in Mac OS X for Android? so read that stack overflow posting; summary: you can select Windows > Prefs > Android > Build and you will see a field that tells the location of your debug keystore, as shown below

Note, we replace /Users/atc/.android/debug.keystore with ~/.android/debug.keystore as in the keytool syntax shown in the command line above.
If all fails go back over these steps.
OK. You have your SHA certificate. You need to use this every time you create a new project that uses Google Maps so store your SHA (it does not change) somewhere that you can find later. Or store the command -- you can always re-run it.
Register a project in the Google APIs Console and add the Maps API
Now you have to get a project and register for the API. So after you have your signing certificate fingerprint we need to create a project for your application in the Google APIs Console and register for the Maps API.
To that we have to follow these steps:
- Click on Google APIs Console: https://code.google.com/apis/console
- If it is the first time you open the console, it will show you an error.
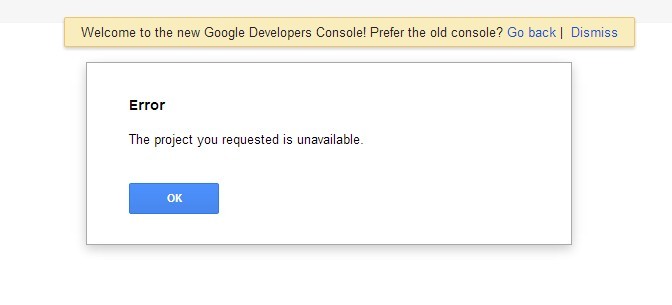
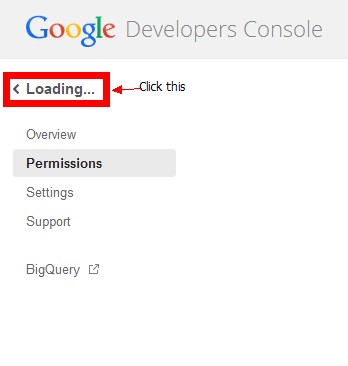
Click OK, then click "Loading" at the column on the left.
- You will prompted to create a project that you use to track your usage of the Google Maps Android API. Click Create Project.
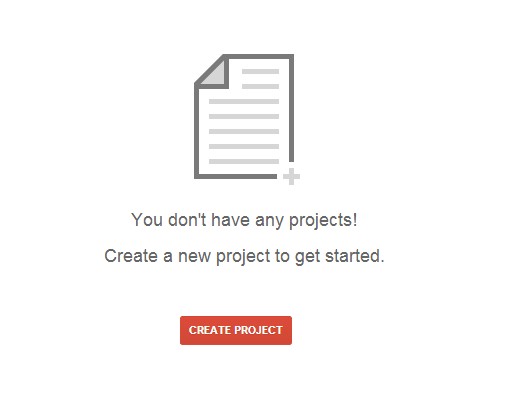
Input your project name, select "Terms and Service" then click "Create" to create a new project.
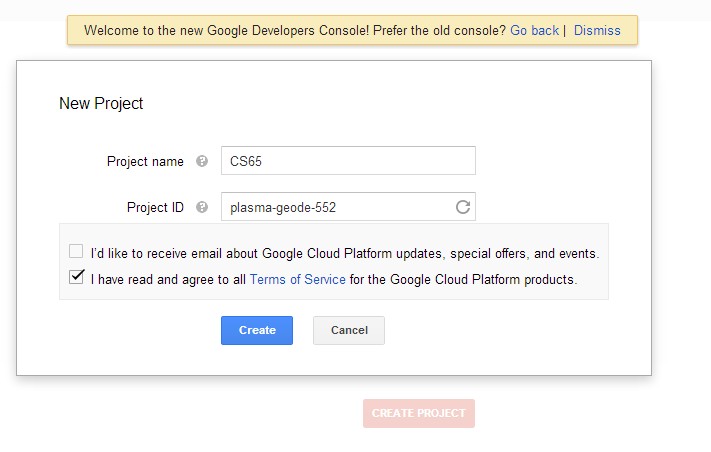
After creating the project, you can see the project in the project list. Click the project to go to the next step.

- Click "APIs & auth" and "APIs" on the upper left corner.
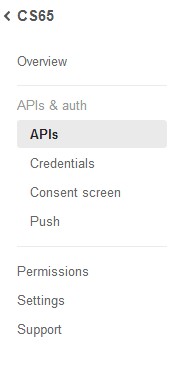
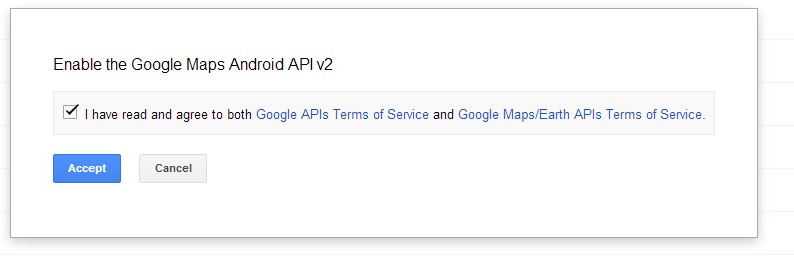
You will see a list of APIs. Find Google Maps Android API v2 and click the "Off" button to turn it on.

A dialog will show up, you need to agree the terms of services.
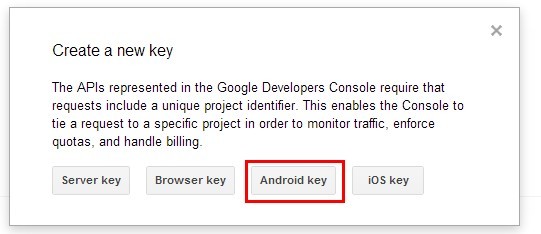
- Now, you have enabled the Google Map API. You need to add credentials so that your app can be authorized to use the API. Click "APIs & auth" and "Credentials" on the upper left corner, then click "CREATE NEW KEY" under "Public API access"

Click Android Key in the following dialog.
In the resulting dialog, enter the SHA-1 fingerprint, then a semicolon, then your application's package name. For example:
You will need the package name from your project -- you find that in the manifest, for example:
You will also need your SHA certificate
OK. Now follow the instructions and put your SHA and package name into the field, shown below using a ; between the SHA and package name.
You will also need your SHA certificate
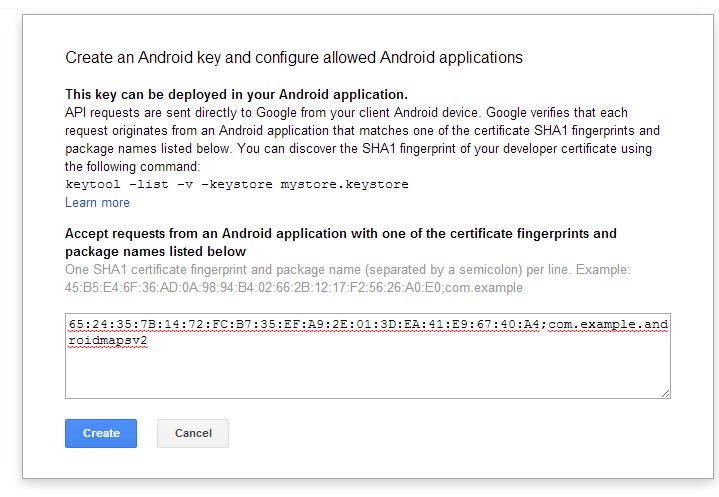
Now you will see the new key, as shown below

The API key is:
You need to add that key to the mainfest of the project with the package name edu.dartmouth.cs.whereami_6. This key will only work with this project and no other one.
One problem I had -- was I clicked not on New Android Key but by accident (because I'm an idiot) I clicked on Create New Browser Key. Guess what? My code would not work but compiled OK. I saw from the CatLog that the map was not loading from Google and knew the key was screwed up but it took me a couple of hours to see the nose on my face -- which is sizeable as you well know.
STEP 3: Specify settings in the Application Manifest
There are a number of additions to the Manifest file (we discuss them in this write up) but we focus here on the meta-data. Once you have the API key you need to add it into the Manifest as part of the meta-data, as shown below.
There are the a number of additions to the manifest needed -- not necessarily in the sequential order, as they appear in the manifest:
meta-data: The first meta-data element sets the key com.google.android.maps.v2.API_KEY to the value of your key -- that is, AIzaSyBzpZBg7esbJeF5UXYHnPX0ljwQfRSbNW4 -- and makes the API key visible to any MapFragment in your application. The second meta-data element sets the key com.google.android.gms.version to the value of your Google Play Services version. This is required for any app that uses Google Play Services.
permission: We set the permission for the app to receive maps. Make sure you add this permission of maps will not load.
uses-permission: The application must be granted uses permission in order for it to operate correctly. Permissions are granted by the user when the application is installed, not while it's running. There are a number related to maps:
- INTERNET is used by the API to download map tiles from Google Maps servers.
- ACCESS_NETWORK_STATE allows the API to check the connection status in order to determine whether data can be downloaded.
- READ_GSERVICES allows the API to access Google web-based services.
- WRITE_EXTERNAL_STORAGE allows the API to cache map tile data in the device's external storage area.
- ACCESS_COARSE_LOCATION allows the API to use WiFi or mobile cell data (or both) to determine the device's location.
- ACCESS_FINE_LOCATION allows the API to use the Global Positioning System (GPS) to determine the device's location to within a very small area.
- ACCESS_NETWORK_STATE allows applications to access information about networks.
- uses-feature: Google Maps Android API v2.0 requires OpenGL ES version 2. Therefore you must add a
STEP 4: Add a path to the Google Map APIs.
Almost there. You need to set up your path library for Google Map APIs:
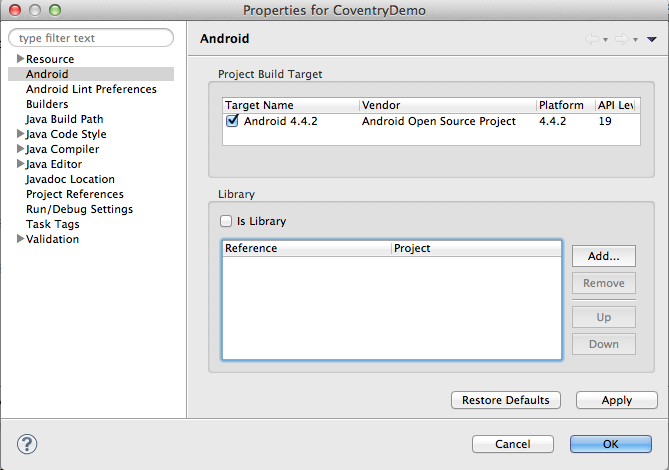
- Under Project in Eclipse (ADT) go to Properties.
- Click on Properties-> Android -> Library
- Click Add to open the Project Selection dialog.
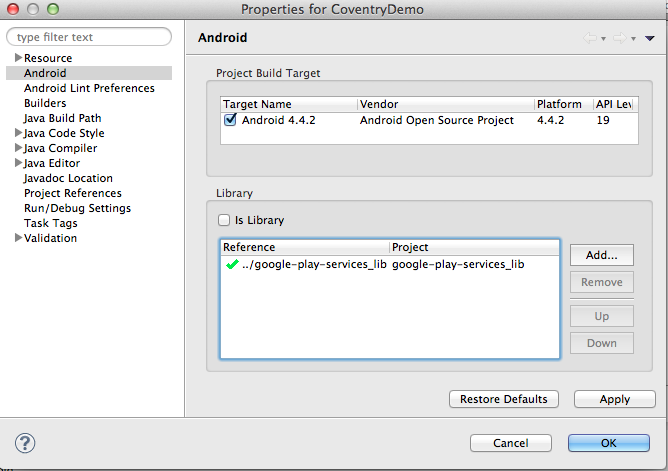
- Select the google-play-services_lib project (which you already loaded into your workspace in STEP 1) and click OK, as shown below.
- Click Apply in the Properties window and OK and you are done.
See below for some image dumps of the process:
First, goto Project > Properties and select Android (in the left panel) as shown below.
Under Library select Add and select google-play-services_lib and click OK as shown below.
In your project you will see that the library has been installed under a number of libraries folders, as shown below.
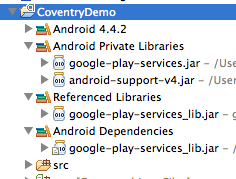
OK you are all set in terms of adding the library to your project. Again, you have to repeat this step for each project that uses Google Maps.
I AmHere -- a tracking app
The first application we look at this is an extension of the applications we developed for the lecture on the LocationManger. As shown in the image below the app lists:
- current longitude and latitude of your location
- the address
- and location on a map with a sickly green marker
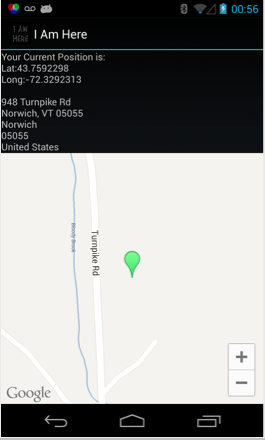
The cool thing about this app is that as you move around it will update your position on the map. It tracks you. There is little control over the app. You can move the map around or use the simple zoon in / zoom out buttons on the map -- that is about it.
Let's discuss the code. Note, in the code examples below we snip some of the code that we have already discussed in the pervious lecture. You can look at the demo app source code to see the complete source code.
Much of the structure of the code is familiar now.
Set up Google Maps in onCreate()
The code first gets a reference to a GoogleMap using getFragmentManager() on MapFragment set up in layout/activity_main.xml, as shown below in the layout file
The getMap() method renders the Google Map returned from the server into the MapFragment in layout. The type of map is then set to normal.
There are a number of types of maps that can be selected:
- MAP_TYPE_HYBRID: Satellite maps with a transparent layer of major streets.
- MAP_TYPE_NONE: No base map tiles.
- MAP_TYPE_NORMAL: Basic maps.
- MAP_TYPE_SATELLITE: Satellite maps with no labels.
- MAP_TYPE_TERRAIN Terrain maps.
Change the type of the map in your code and look at the map rendered.
After the map type is set we get the current location and set a marker at that location and zooms in. The location manager sets up the time and distance parameters as well as the call back listener for location updates:
We discussed these call backs in the last lecture. So check that out again if you need to. The helper function then gets called to update the map if necessary.
User Tracking
Each time the callback onLocationChanged() is called the map is updated simply by calling the helper function discussed below. There is no action for the other callbacks in this code -- there really should be.
Helper for Tracking
The helper function simply has the current location passed to it. It first removed the current marker and redraws a new marker at the new location.
Coventry Demo
The Coventry app allows the user to interact with the map by placing markers on the map and then connecting up the markers with polylines drawn on the map. A polyline is a list of points, where line segments are drawn between consecutive points. The app detects long clicks on map and adds a marker. Lines can be drawn between markers using polylines. To do this the use clicks (do not long click) on a marker then moves to another marker and clicks. To remove the markers and lines click on the map.
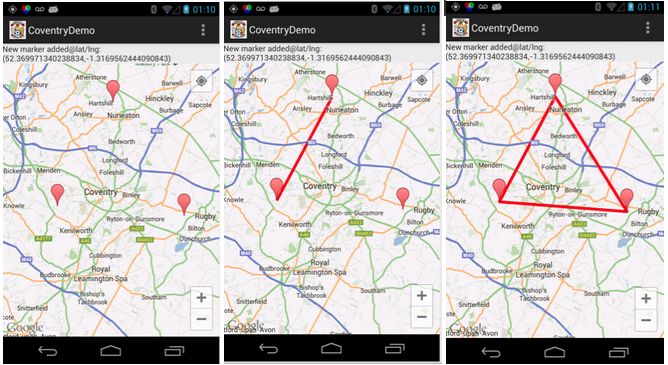
In the image below the user has long clicked on three places on the map creating three markers. Then the user has clicked (just normal short click) on each point and the lines are drawn constructing a triangle around the vibrant metropolis of Coventry, England.
onCreate()
Using the menu to display OpenSourceSoftwareLicenseInfo
This code sets up and inflates the menu which is rendered. If the user selects the "legal notice" menu item a dialog with the licence is shown. Nothing new for us here. The dialog is constructed using a AlertDialog.Builder as normal.
Checking connected onResume()
Before the app comes into focus the app checks if the map service is still available. If for example the app is pushed into the background the map needs to be updated and displayed again when it comes into focus. If the app can't "connect" to play services the app informs the user.
Adding markers and drawing lines
The user can move the map around and zoom in/out as they wish. The callbacks set up in onCreate() are shown below:
- onMapLongClick(LatLng point), which will create and display a marker
- onMarkerClick(Marker marker), which will enable a polyline to be drawn between to markers that are clicked consecutively.
- onMapClick(LatLng point) , which will clear the current lines after the map has been clicked followed by the user clicking on an existing marker or creating a new marker.
Let's look at the code more below.
The logic for onMarkerClick() is straightforward. First time onMarkerClick() is called it will call new PolylineOptions().add(marker.getPosition()) to add the marker to the polyline. Next time it is called it will add the second marker --rectOptions.add(marker.getPosition()) -- and then draw the line. Each time a new marker is added (via a long click) and a line drawn -- the complete set of lines are redrawn starting at the first marker added to the rectOptions (i.e., the ployline). If the user clicks on the map (not the markers) and then clicks on any marker or does a long click to create a new marker then the line or polyline is remove - that is, the line between the markers is cleared.
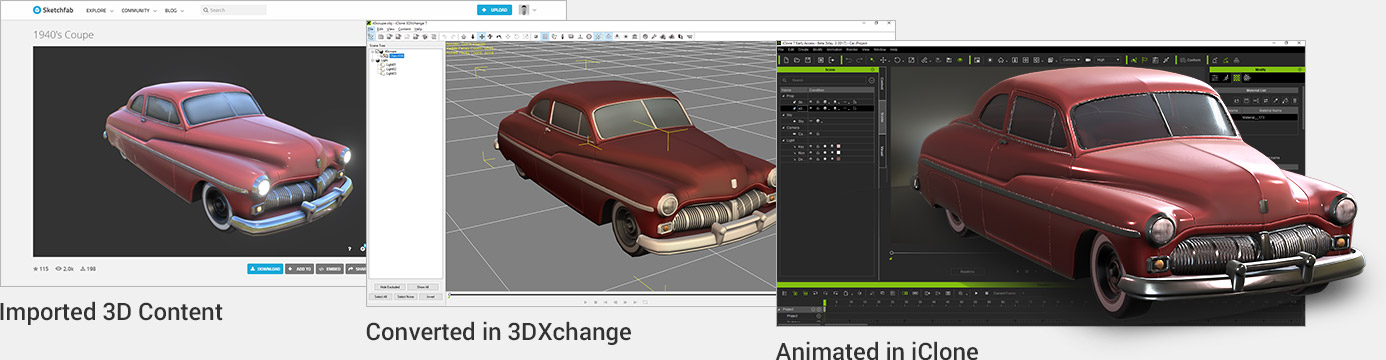
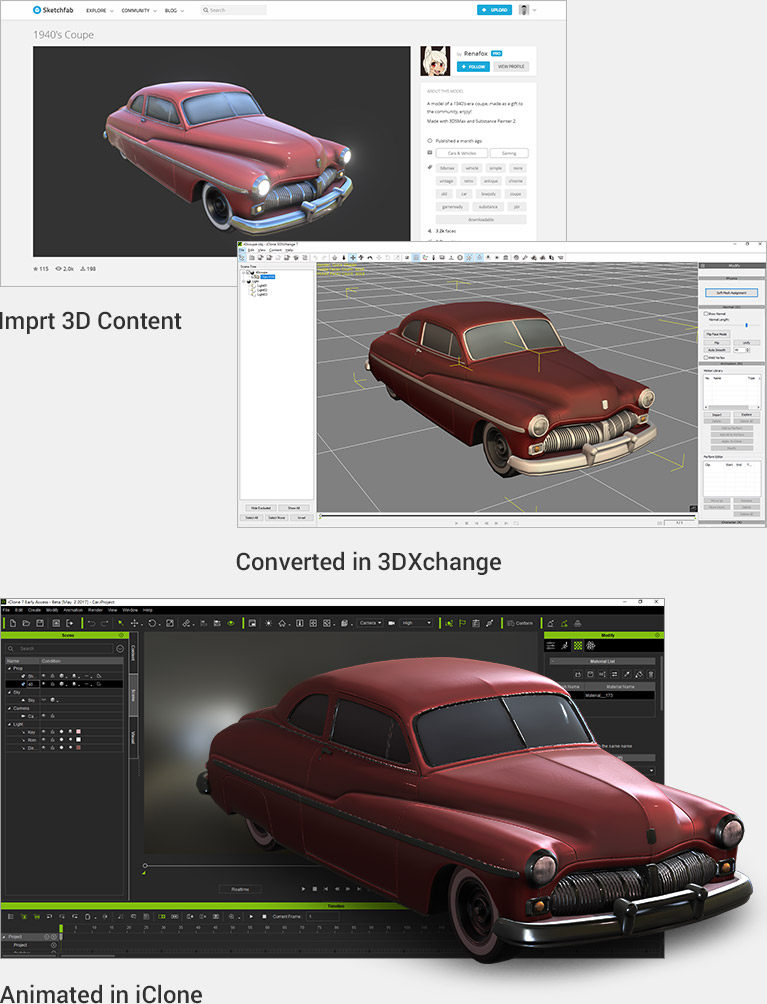
Animation Pipeline via 3DXchange
3D ANIMATION
PIPELINE
With 3DXchange Pipeline, you can import and export all types of 3D assets, including static objects, animated props, skin-bone rigged characters, and motion files. You can also repurpose them with output options tailored for Unity, Unreal, Maya, Blender, Cinema 4D or Daz Studio. This makes iClone a universally essential tool for both game design and CG workflow.
NOTE: 3DXchange 7 is only compatible with iClone 7, there is no backwards compatibility.
Animated Character Conversion
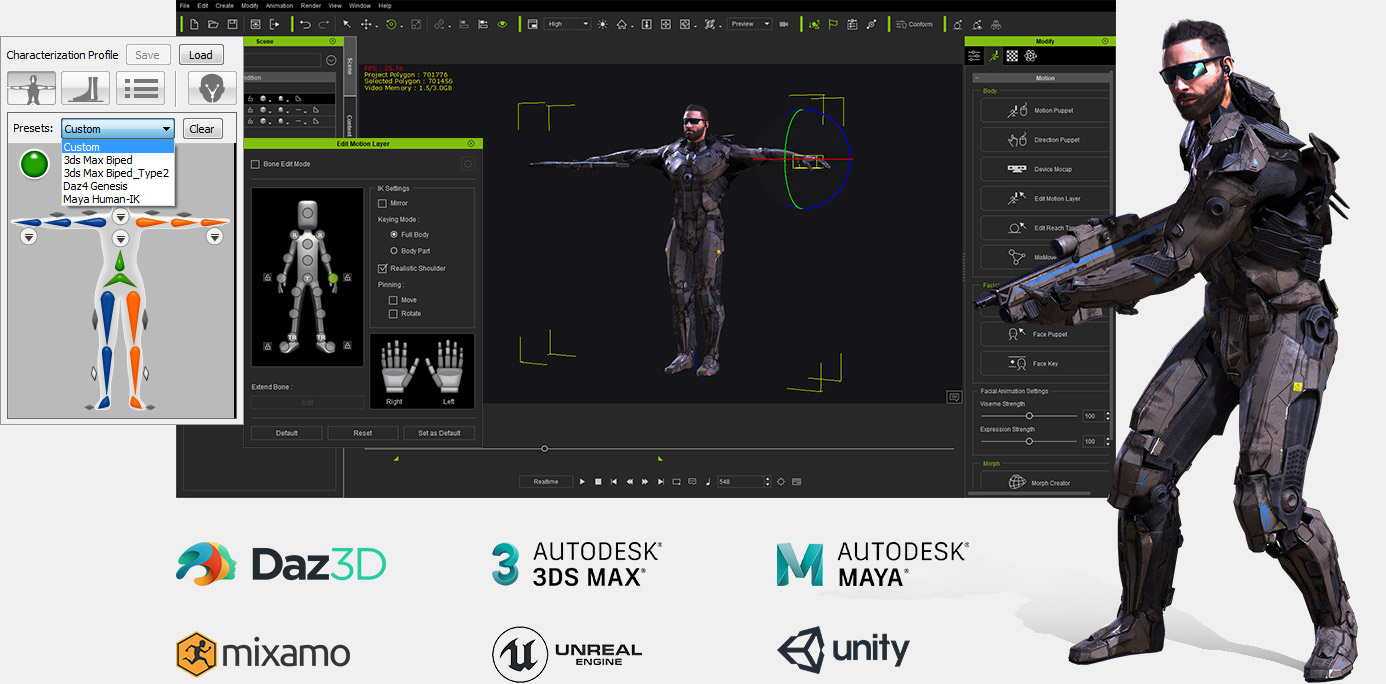
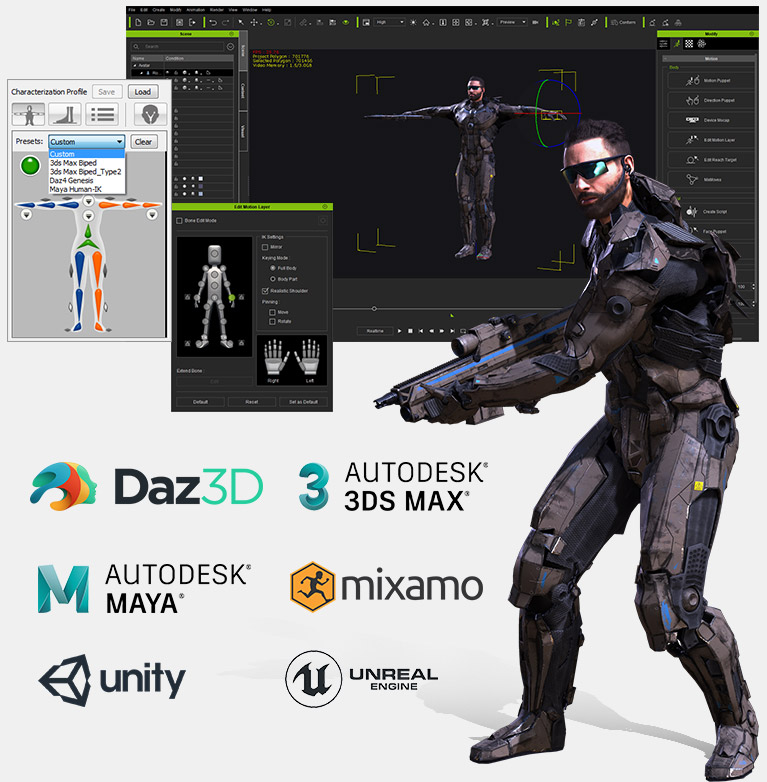
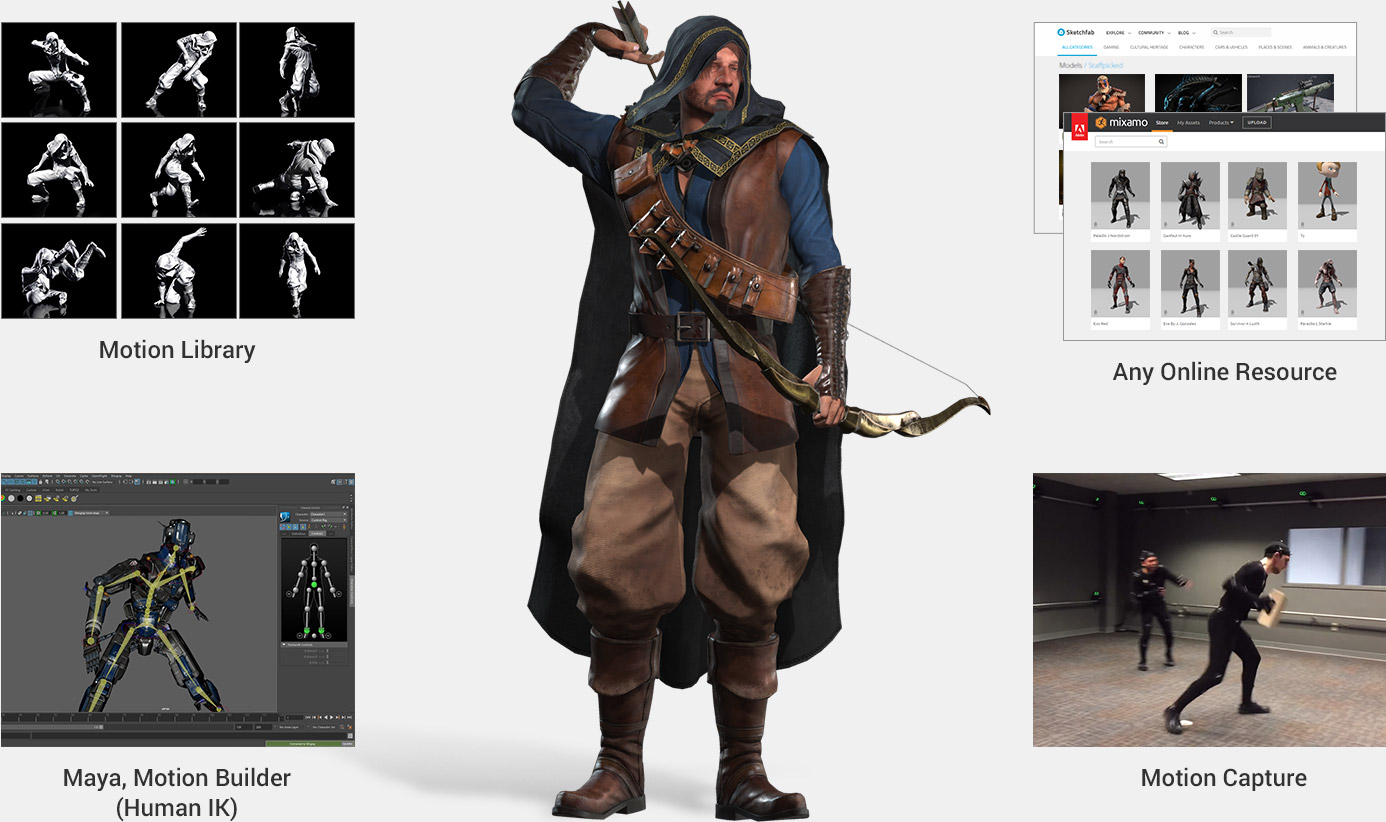
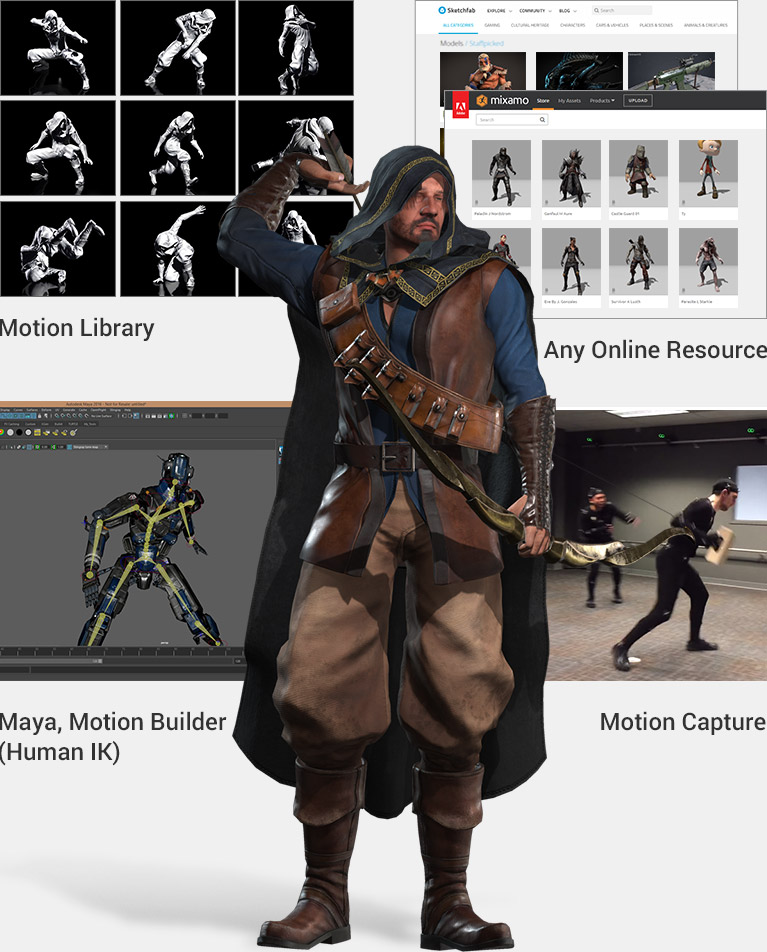
Utilizing the built-in characterization panel in 3DXchange, you can convert external characters into iClone via FBX format quickly and easily. The newly converted characters will then be compatible with thousands of iClone motion files, as well as powerful motion tools like Body Puppet, MixMoves, and motion capture. Animate any character from Daz, Maya, 3DS Max, Mixamo, and others in a heartbeat! Know More >
Prop Conversion
3DXchange provides all the tools you need to import and export 3D props. The Transform & Alignment tools allow you to quickly rotate and resize the imported model with the correct scale and axis parameters. The Pivot tools help you to set a custom pivot point that controls the object’s rotational behavior. The Group tool allows you to separate objects, edit model hierarchy, build parent-child node relations, rename objects, exclude unwanted parts, and output selected objects separately for improved animation capability later. Know More >
Motion Conversion
By converting external motion data into iClone via FBX/BVH format, you are able to bring in motion data from any external motion library, popular motion editing tools, or even life-like motion capture for use with your iClone standard characters. This motion data can also be further edited or refined using iClone’s powerful Human IK motion editing tools. Know More >
Facial Setup
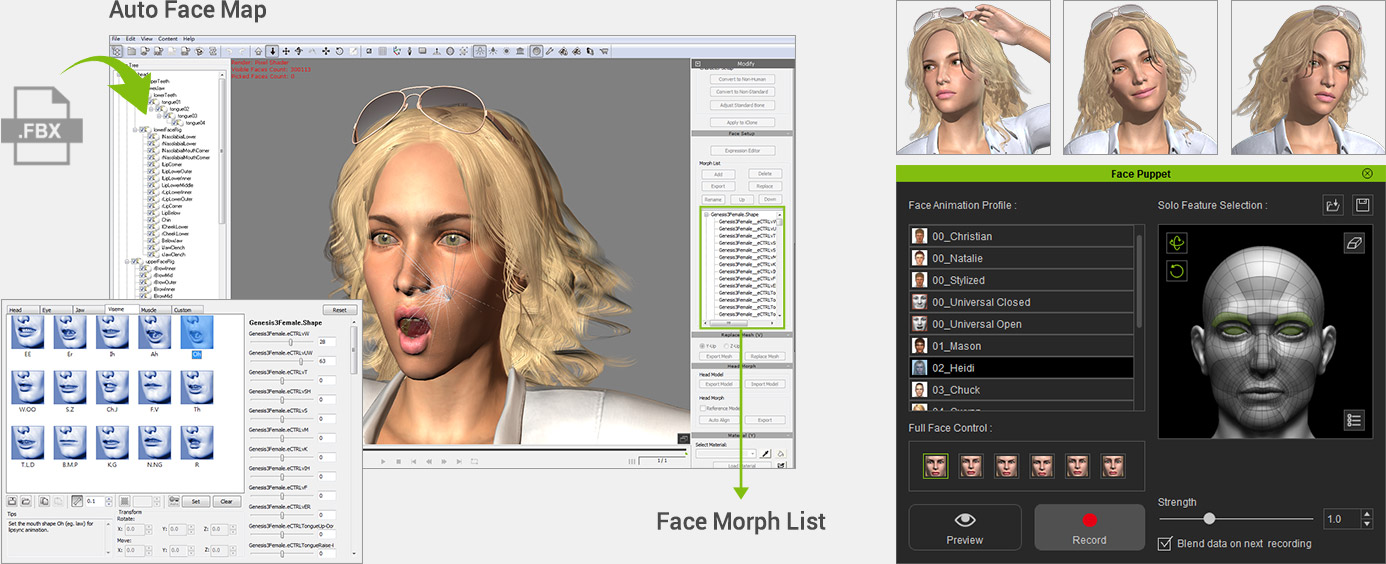
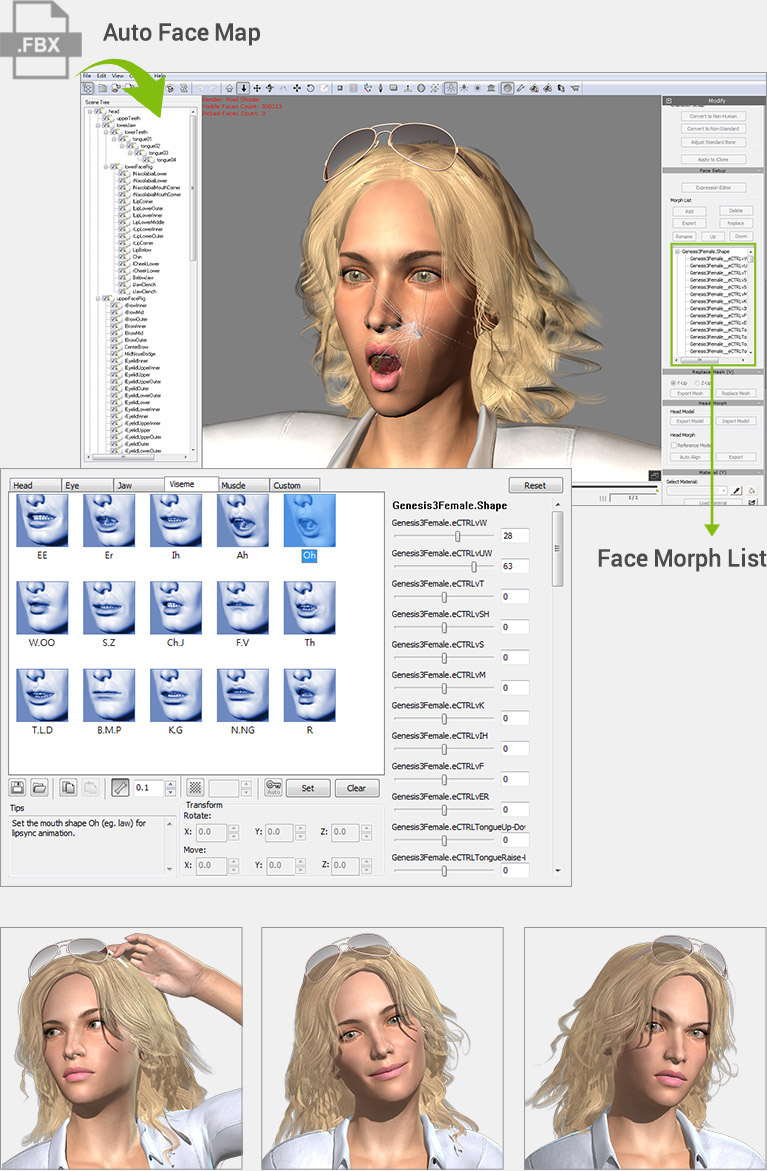
Imported characters can take advantage of iClone’s powerful facial animation tools too! 3DXchange supports all types of talking characters, allowing you to enrich your scene with more professional character assets that are more expressive with rich facial animation, regardless of whether or not the character was designed using a facial bone rig or facial blend shapes. Know More >
Direct In/Out in iClone
To further simplify the pipeline process, 3DXchange allows several critical import and export features to become accessible inside iClone 7. These include the highly anticipated batch FBX export function which allows you to export characters, props, and cameras all at once. iClone 7 can now also bring in multiple morphs from OBJs for organic morph animations. Know More >
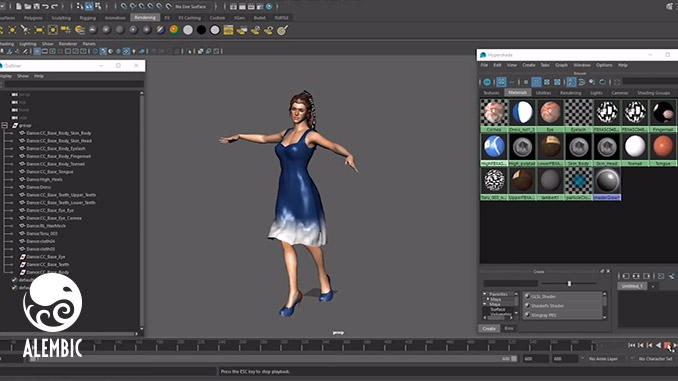
Alembic Out

FBX Out
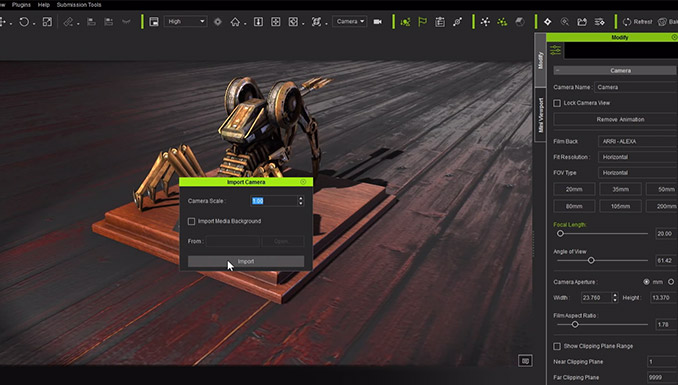
Importing a Camera from 3D Tools

Exporting Camera with Perfect Frame Alignment

3DXchange 7 Pipeline Trial
- Version: v7.7.4310.1
- Platform: Win 7 SP1 / 8 / 10
- Release Date: 2020-07-23
- Category: Trial Software (Pipeline trial edition; 30 days)
| Edition Comparison | Item | Trial | Full |
|---|---|---|---|
| Program | Usage | 30 days | No limitation |
| Export content in iContent (iClone native format), FBX, BVH, or OBJ *If you export 1 character with 3 motions in one FBX file, you will spend 4 export times. | 15 times | No limitation | |
| Export Length (Motion) | 30 seconds | No limitation | |
| Login to activate | Required | No Need | |
| Program (in iClone, Morph Creator, CC) | Usage | 30 days | No limitation |
| Export FBX, OBJ, ABC | 15 times | No limitation | |
| Export Length (Motion) | 20 sceonds | No limitation | |
| Content | Live content purchase | No | Yes |
| Bonus character resource pack | No | Yes |
Free Update

- Version: v7.7.4310.1
(for PRO & Pipeline 7.6 above) - Release Date: 2020-07-23
- File Size: 57.9 MB
Make the World Your Digital Asset
Capture, analyze and visualize your environment with DJI Terra – an easy to use mapping software developed to help industry professionals transform real-world scenarios into digital assets.
Plan. Process. Analyze and Execute.
- Mission Planning
- Data Acquisition
- Area Mapping
- Data Analysis
Digitize the World Around You
Construction
Collect, measure and analyze data with accuracy across projects
Infrastructure
Easily perform detailed inspections on complex assets and structures
Energy
Safely inspect vertical assets and structures, with special optimizations for power lines
Public safety
Achieve rapid turnaround time for gathering on-site critical information
Agriculture
Get an in-depth understanding of your field to help you generate greater yields
Filming
Optimize previsualization to improve planning workflows across your team
Mission Type
Create efficient flight paths using predefined waypoint actions and adjustable parameters like altitude, speed, gimbal pitch angle, aircraft heading and more. For more complex and tight missions that require high attention to detail, use 3D Flight Visualization to design and simulate tasks on existing 3D models.
With just a few taps on the screen, you can automate complex missions, allowing you to seamlessly capture imagery which can be processed to produce a variety of maps and models for further analysis, and to aid decision-making.
When accuracy is essential and details are vital to your critical operations, Oblique lets you capture a rich 3D model data set by adjusting the angle of the camera at a tilted angle, giving you an extra crisp view of the asset.
Create automated flight missions around roads and railways by simply drawing a line on the map. Adjust mission settings to change the total area mapped, giving you the flexibility to choose between creating high-definition 2D maps and 3D models or quick overviews.
Automatically generate waypoints and flight routes based on one or more points selected in a local 3D model or point cloud (or a third-party point cloud). A simulated camera view including the selected point is displayed onscreen to enable better waypoint selection and more efficient flight route planning, automating inspection workflows.
Seamless Workflows, Accurate Results
Unparalleled efficiency and user experience
Import images with ease while navigating the intuitively designed interface effortlessly.
Bulk process up to 400 images/1 GB of RAM1, minimizing the wait time between field work and digital visualization.
Run reconstruction missions by employing multiple graphics cards simultaneously to improve efficiency.
Meet and exceed your project standards
Generate highly detailed 2D orthomosaics and 3D models with enhanced absolute accuracy by setting Ground Control Points (GCPs) and checkpoints, so you can measure and inspect with ease.
View a quality report of your mission to ensure the results meet your accuracy standards.
Compatibility and flexibility
Convert the coordinates of your maps and models into 8500+ major coordinate systems by simply selecting the output that fits your needs.
Incorporate POS data, GCPs, or both sets of data to create georeferenced maps and models with enhanced accuracy directly in the target coordinate system required by the project.
Mapping2
2D Maps
Real-time Mapping
Quickly generate a 2D orthomosaic of the selected area in real-time. Not only is this ideal for creating detailed flight paths in remote areas but it’s also useful for time-sensitive missions that require quick decision-making on site.
2D Reconstruction
Generate high resolution orthomosaics, enabling you to get detailed and accurate measurement results for all your critical projects.
2D Multispectral Reconstruction3
Process multispectral images to generate vegetation index maps including NDVI and NDRE. Create prescription maps for variable rate application using DJI’s Agras drones to improve crop yields while driving down costs.
3D Models
Real-time 3D Point Cloud4
When efficiency is key, quickly render and visualize a 3D point cloud of the mapped area. Make decisions based on the preliminary model and check for completeness immediately or plan 3D flights on-site.
3D Reconstruction
Get sharp and realistic representations of your surroundings throughout various industrial applications, be it accident reconstruction, recreating thin power lines and complex vertical structures, managing major construction projects and more. The CUDA-based reconstruction algorithms are capable of quickly processing large amounts of data to deliver quality results.
With Region of Interest, image reconstruction can be performed to specific target region. In turn, this saves processing time and improves efficiency, while generating a clearer model or point cloud.
Seamless Connection with Your Fleet of DJI Drones
DJI Terra is compatible with the following Phantom 4 Series drones:
Phantom 4 RTK (Remote Controller)
Phantom 4 Pro V2.0
Phantom 4 Pro + V2.0
Phantom 4 Pro
Phantom 4 Advanced and Phantom 4
The Beginning of Next Generation Mapping Solutions
Harness the power of AI-driven mapping solutions designed to take your industrial projects to the next level. Whether it’s object classification, site inspections and more, you can start developing task-specific mapping solutions to seamlessly carry out missions.
Define mission objective, plan desired flight plan, and with a tap of a few buttons, autonomously collect critical data so you can achieve the required outcome.
Utilize refined image recognition technology to generate 2D and 3D data, resulting in a more realistic representation of your assets, objects, surroundings and more.
Implement tools and machine learning techniques, which can be used across a variety of different industries – like classification algorithms for identifying trees, objects, and other scenarios.
Take the required action, and enjoy more efficient processes with machine control – be it automated crop spraying, monitoring work sites, transporting materials and more.
Terra License Plans
| Feature/Version | Advanced | Pro | Electricity |
|---|---|---|---|
2D Reconstruction (Field) | |||
2D Reconstruction (Urban) | |||
2D Multispectral Reconstruction | |||
Streamline Your Operational Workflows
DJI Terra Advanced, Pro and Electricity versions are available for order through official DJI dealers. If you would like to make a purchase, please enter your details below and we’ll get back to you. To get a trial version, you can contact your local enterprise dealer.
1. The processing capacity of 400 images/1 GB of RAM is estimated using the size of images captured using the Phantom 4 RTK. This is the equivalent of processing 8 gigapixels of data/1 GB of RAM.
2. System requirements: Windows 7 or above (64 bit, 16GB RAM), NVIDIA graphics card (4GB) with compute capability 3.0 or above.
3. Aircraft supported: P4 Multispectral
Multispectral Imaging Bands supported:
Blue (B): 450 nm ± 16 nm, green (G): 560 nm ± 16 nm, red (R): 650 nm ± 16 nm, red edge (RE): 730 nm ± 16 nm, near-infrared (NIR): 840 nm ± 26 nm
Vegetation indices supported: NDVI, GNDVI, NDRE, LCI, OSAVI.
4. Feature only available when using the Phantom 4 RTK or Phantom 4 Pro V2.0.


- Mission Planning
- Data Acquisition
- Area Mapping
Make the World Your Digital Asset
Prices on the official website are for reference only. Visit the DJI Online Store to see the most up-to-date prices.
What’s New in the 3D World Map v2.0 serial key or number?
Screen Shot

System Requirements for 3D World Map v2.0 serial key or number
- First, download the 3D World Map v2.0 serial key or number
-
You can download its setup from given links:

3D World Map v2.0 serial key or number & PC Free Download

3D World Map v2.0 serial key or number& PC Free Download
