
Sounding Keyboard and Mouse v2.5 by LUCiD serial key or number

Sounding Keyboard and Mouse v2.5 by LUCiD serial key or number
Ubuntu Documentation

MacBook Pro 5,1 and 5,2 on Ubuntu 10.04 LTS
This page aims to describe the steps needed, to fully enable all features of the 5th Generation MacBook Pro (release date: late 2008, early 2009) when using Ubuntu 10.04 LTS (Lucid Lynx). You can find out what model you have by typing at the terminal:
This should either return MacBookPro5,1 or MacBookPro5,2. If not, this page is not really so well suited for your situation. If you have a MacBook Pro, but a different hardware revision, please go to the MacBook Pro start page. If you have a different Intel CPU-based Macintosh product, go to the Mactel Community Help Pages to find the right wiki.
Overview
Anything not mentioned here probably already works out of the box. If not, please refer to the Ubuntu Apple Users forum.
Feature
Support status
Sensors (temps & fans)

Suspend & Hibernate

Reboot
Desktop Effects (Compiz)

HFS+ (only read)
CD/DVD Writing
Bluetooth
Screen brightness adjustment
Keyboard functions (Brightness, volume, etc)
Sound
Microphone
External Monitor

Wireless (AirPort)
Trackpad
Webcam/iSight
Apple Remote Control
(works out-of-the-box) (works, with remarks) (needs manual install)  (won't work) (not yet documented)
Basic Installation Instructions
Common things about installing and maintaining Ubuntu on Intel-based Macs: Intel CPU-based Macintosh Generic Installation Instructions, but remember that rEFIT supports this MacBook only from 0.12. For 64Bit Ubuntu use rEFITt 0.14 or higher. Info rmation about rEFIt can be found at http://refit.sourceforge.net/
Package Support for Intel Macs
Install the modules from the MactelSupportTeam/PPA. Lucid Lynx have in the Kernel 2.6.32 all that need you to make work fine your MacBook Pro 5,1, but to Make work the buttons for keyboard backlight just add this PPA:
sudo add-apt-repository ppa:mactel-support
Install:
- pommed (Make work the buttons for keyboard backlight)
If you want to install them:
sudo apt-get install pommedBoot/GRUB/Plymouth
Boot was nice the first boot for me, but the resolution went back to 640x480 right after. Follow these instructions to get GRUB and Plymouth back http://idyllictux.wordpress.com/2010/04/26/lucidubuntu-10-04-high-resolution-plymouth-virtual-terminal-for-atinvidia-cards-with-proprietaryrestricted-driver/
Just don't forget to fill in the resolution you want (typicaly: 1440x900)
Reboot
Confirmed working out of the box.
Suspend & Hibernate
Suspend is working out of the box, way faster than on Karmic.
Hibernate is pretty slow, possibly slower than boot up.
Wireless
STA drivers in the non-free Hardware drivers can be installed. You will need a wired Internet connection to do this. Go to System->Administration->Hardware Drivers. Select the Broadcom STA options and click enable.
Many people confirmed having a lot of disconnections with the latest version of network manager. See https://bugs.launchpad.net/ubuntu/+source/bcmwl/+bug/488340
It can be fixed using volanin's ppa: http://ppa.launchpad.net/volanin/ppa/ubuntu/pool/main/n/network-manager/
DON'T INCLUDE THIS PPA IN YOUR APT, ONLY DOWNLOAD NETWORK MANAGER AND DEPENDECIES There is conflicts with the other packages he maintains
STA drivers of ubuntu 11.04 works very well on 10.04 and resolve this issue. You can download it here:http://packages.ubuntu.com/natty/bcmwl-kernel-source
Sensors
To enable all these sensors:
One motion sensor
Ambient light sensor
One fan sensor
16 temperature sensors
You have to edit /etc/modules:
gksudo gedit /etc/modulesAnd add at the end:
coretemp applesmcAfter a reboot (or modprobing the modules), they will be recognized. You can verify this by using
dmesg | grep appleOutput should be something like:
[ 975.586518] applesmc: Apple MacBook Pro 5 detected: [ 975.586522] applesmc: - Model with accelerometer [ 975.586524] applesmc: - Model with light sensors and backlight [ 975.586526] applesmc: - Model with 20 temperature sensors [ 975.587187] applesmc: device has already been initialized (0xe0, 0x00). [ 975.587189] applesmc: device successfully initialized. [ 975.588120] applesmc: 2 fans found. [ 975.590446] input: applesmc as /devices/platform/applesmc.768/input/input10 [ 975.594503] applesmc: driver successfully loaded.Unfortunately, none of the sensors have correct names. There is a legacy description suitable for other MacBook's at the old mactel-linux site with an (incorrect) sample sensors.conf at this mactel 2007 mail thread.
Add this to your sensors.conf or sensors3.conf file to provide context for some of the temperature sensors (this was generated on a MBP 5,2):
chip "applesmc-isa-0300" label "temp1" "TB0T Enclosure Bottom 0" label "temp2" "TB1T Enclosure Bottom 1" label "temp3" "TB2T Enclosure Bottom 2" label "temp4" "TB3T Enclosure Bottom 3" label "temp5" "TC0D CPU Diode" label "temp6" "TC0F CPU ???" label "temp7" "TC0P CPU Pin" label "temp8" "TG0D GPU Diode" label "temp9" "TG0F GPU ???" label "temp10" "TG0H GPU Heatsink" label "temp11" "TG0P GPU Pin" label "temp12" "TG0T GPU Transistor" label "temp13" "TG1H GPU 2 Heatsink" label "temp14" "TN0D Northbridge Diode" label "temp15" "TN0P Northbridge Pin" label "temp16" "TTF0 Unknown" label "temp17" "Th2H Heatsink 2" label "temp18" "Tm0P Memory Controller" label "temp19" "Ts0P PCI Express Slot Pin" label "temp20" "Ts0S PCI Express Slot (unk)" label "fan1" "Left Fan" label "fan2" "Right Fan" chip "coretemp-isa-0000" label temp1 "Core0" chip "coretemp-isa-0001" label temp1 "Core1"Keyboard functions
Almost all keyboard functions work out of the box. The only exceptions I could find are the LED Backlighting controls and the Expose and Dashboard keys.
In order to have Ubuntu correctly recognize the keyboard backlight function, you have to install the module pommed from the Mactel PPA repository; to do so, run:
sudo apt-get install pommedBluetooth
Pairing works out of the box. Beyond that, not tested.
If you have issues with Bluetooth, try to reset it with:
sudo hciconfig hci0 resetIf you want:
send file: launch Applications>Accessories>Bluetooth (bluetooth-applet)
receive file: set name and visibility with System>Preferences>Bluetooth (bluetooth-property) and launch Applications>Accessories>Bluetooth File Sharing (gnome-obex-server)
Remember that the system service Bluetooth device manager (bluetoothd) must be running in the background.
Note: Did not succeed to connect two computers or to browse a device yet!
Trackpad
Left-click, right-click (two finger)use and basic trackpad work out of the box. To enable two finger scrolling and tap to click:
System>Preferences>Mouse>Touchpad
Desktop Effects (Compiz)
You must enable the a non-free graphics driver to use Compiz. Go to System -> Administration -> Hardware Drivers and choose the NVIDIA accelerated graphics driver (version 190). It works on MacBook Pro, you will have to reboot after install.
External Monitor
Using Xinerama
WARNING This section was copy pasted, use with caution, not tested
Note: this work on Jaunty with ndivia-settings but with glitches: compiz doesn't work and I couldn't move the mouse cursor from one screen to another.
Using the restricted nvidia driver >= 177.80, one can set up a dual head configuration and make full use of an external display. An example xorg.conf configuration of a working dual head setup using Xinerama (separate X sessions for each display) is shown below.
* Note that in the following example the external LCD is rotated (counterclockwise) left.
Section "ServerLayout" Identifier "Layout0" Screen 0 "Screen0" Below "Screen1" Screen 1 "Screen1" 0 0 EndSection Section "Module" Load "glx" EndSection Section "ServerFlags" Option "Xinerama" "1" EndSection Section "Monitor" Identifier "Configured Monitor" EndSection Section "Monitor" Identifier "Monitor0" VendorName "Unknown" ModelName "Apple Color LCD" HorizSync 30.0 - 75.0 VertRefresh 60.0 EndSection Section "Monitor" Identifier "Monitor1" VendorName "Unknown" ModelName "(Some model name here which is detected automatically)" HorizSync 31.0 - 65.0 VertRefresh 59.0 - 61.0 EndSection Section "Device" Identifier "Configured Video Device" Driver "nvidia" Option "NoLogo" # Option "RandRRotation" "on" # Option "Rotate" "CCW" EndSection Section "Device" Identifier "Device0" Driver "nvidia" VendorName "NVIDIA Corporation" BoardName "GeForce 9300M" Screen 0 EndSection Section "Device" Identifier "Device1" Driver "nvidia" VendorName "NVIDIA Corporation" BoardName "GeForce 9400M" Screen 1 EndSection Section "Screen" Identifier "Default Screen" Device "Configured Video Device" Monitor "Configured Monitor" DefaultDepth 24 EndSection Section "Screen" Identifier "Screen0" Device "Device0" Monitor "Monitor0" DefaultDepth 24 Option "TwinView" "0" Option "metamodes" "DFP-0: nvidia-auto-select +0+0" SubSection "Display" Depth 24 EndSubSection Option "NoLogo" Option "RandRRotation" "on" # Option "Rotate" "CCW" EndSection Section "Screen" Identifier "Screen1" Device "Device1" Monitor "Monitor1" DefaultDepth 24 Option "TwinView" "0" Option "metamodes" "DFP-1: nvidia-auto-select +0+0" SubSection "Display" Depth 24 EndSubSection Option "NoLogo" Option "RandRRotation" "on" Option "Rotate" "CCW" EndSectionNote: NVidia splash-logo is disabled due to the Option "NoLogo" entries as seen in the above example
Using TwinView
Make sure to have the monitor plugged in before you boot the laptop, because the screen detection might not work correctly otherwise. With the binary NVidia driver installed, go to System -> Preferences -> Display. You will be redirected to nvidia-settings, which can also be found directly under System -> Administration -> NVidia X Server Settings. In the X Server Display Configuration, click on detect displays, then click on your external display, configure button -> TwinView -> Apply changes.
If the external monitor's display looks heavily corrupted in colours and refresh (and you've made a supported resolution and refresh rate is selected), check under GPU-{number} -> DFP-{number} - {external monitor} and switch off the "Force Full GPU Scaling".
Here is a dual head configuration using the restricted nvidia driver (version >= 177.82). The xorg.conf file was generated by nvidia-settings and was tested with a ViewSonic VA1912wb (19" widescreen) LCD at 1440x900, above the MacBook screen. The desktop size is 1440x1700; Xinerama is not used. It may be possible to use this configuration with an external LCD with a different resolution by modifying the "+900" in the Option "metamodes" line to match the height (in pixels) of the desired monitor.
The xorg.conf file, with input device sections omitted, follows:
Section "ServerLayout" Identifier "Layout0" Screen 0 "Screen0" 0 0 InputDevice "Keyboard0" "CoreKeyboard" InputDevice "Mouse0" "CorePointer" EndSection Section "Files" EndSection Section "Module" Load "dbe" Load "extmod" Load "type1" Load "freetype" Load "glx" EndSection Section "ServerFlags" Option "Xinerama" "0" EndSection Section "Monitor" # HorizSync source: edid, VertRefresh source: edid Identifier "Monitor0" VendorName "Unknown" ModelName "Apple" HorizSync 30.0 - 75.0 VertRefresh 60.0 Option "DPMS" EndSection Section "Device" Identifier "Device0" Driver "nvidia" VendorName "NVIDIA Corporation" BoardName "GeForce 9400M" EndSection Section "Screen" Identifier "Screen0" Device "Device0" Monitor "Monitor0" DefaultDepth 24 Option "TwinView" "1" Option "metamodes" "DFP-0: nvidia-auto-select +0+900, DFP-1: nvidia-auto-select +0+0" SubSection "Display" Depth 24 EndSubSection EndSectionSound
Works out the box
Microphone
Works out of the box. You will need to increase the microphone input volume:
System>Preferences>Sound>Input
Remote Control
Coming soon
Screen brightness adjustment
Works out of the box. See keyboard for changing the default operation of the function keys.
Known issues
Increase minimum fan speed
To increase the minimum fan speed, you must first have activated the internal sensors. Then you can run this command:
echo 3000 | sudo tee /sys/devices/platform/applesmc.768/fanX_min(replace X by the fan number, usually 1 to 2.) This will make the fan run at least 3000rpm, still allowing the hardware to spin up under heavier load. Also, this setting change won't last when you restart.
To make it last, place this file in /etc/init.d/applesmc_fan
#!/bin/bash echo 3000 | tee /sys/devices/platform/applesmc.768/fan1_min echo 3000 | tee /sys/devices/platform/applesmc.768/fan2_minand enable it:
sudo update-rc.d applesmc_fan defaults 55Set Graphics Card to Powersave Mode
Both of the following settings belong in the Device section of your Xorg file, located at /etc/X11/xorg.conf.
If you would like to constantly enable powersave mode, add:
Option "RegistryDwords" "PowerMizerEnable=0x1; PerfLevelSrc=0x2222; PowerMizerDefault=0x3"If you would like powersave only when using the battery, use this instead.
Option "RegistryDwords" "PowerMizerEnable=0x1; PerfLevelSrc=0x2233; PowerMizerDefault=0x3"Note that, although users have experienced drops of several degrees C, using this option will lower performance for graphics-intensive applications.
Enable laptop-mode
Some users have reported power savings from enabling laptop mode. To do so, make sure laptop-mode-tools is enabled
sudo aptitude install laptop-mode-toolsDisable UUID in Grub
There have been several cases where, early in the boot process, Grub throws up a message that says: "Gave up waiting for root device"; it also says that it will start a Linux shell, but nothing happens. This leaves the computer stuck at this stage, no matter how long one waits.
Note that this is an intermittent issue; it is entirely possible that a MacBook Pro would boot correctly any number of times, then turn up this error. Furthermore, it is possible to type "reboot" and have the machine boot properly on the next reboot (or after 5 or 10 such attempts).
There is an easy way to avoid this issue; there are 4 steps to follow:
- 1.- While logged into Lucid, in the Terminal application, type the following:
- sudo gedit /etc/default/grub
- GRUB_DISABLE_LINUX_UUID=true
CategoryMac
|

CategoryMac
Ubuntu Documentation
This page aims to describe the steps needed, to fully enable all features of the 5.2 White Macbook (release date: early 2009) when using Ubuntu 10.04, Lucid. You can check here if you own this model: on wikipedia, on apple.com
You can find out what model you have in OSX, System Profiler
If you have a different model, please go https://help.ubuntu.com/community/MacBook and find the right wiki.
Overview
Anything not mentioned here probably already works out of the box. If not, please refer to the Ubuntu Apple Users forum.
Feature
Support status
Sound
Suspend
Hibernate
Shutdown
ACPI, power management, etc
Shell/CTRL-ALT-Fn
Reboot
Desktop Effects (Compiz)
Keyboard functions (Brightness,volume,...)
CD/DVD Writing
Bluetooth
External Monitor
Wireless (AirPort)
iSight
Touchpad (appletouch)
Apple Remote Control
Firewire
(works out-of-the-box) (works perfectly, but needs a little job) (works, with remarks) (won't work - please post if you have hints) (not yet documented - please post if you can test)
Basic Installation Instructions
Common things about installing and maintaining Ubuntu on Intel-based Macs: Intel CPU-based Macintosh Generic Installation Instructions
Wireless (AirPort)
To enable wireless you need to install the restricted Broadcom STA driver. Open System -> Administration -> Hardware Drivers and choose Broadcom Sta.
Desktop Effects (Compiz)
You probably want to enable the proprietary graphics driver. Go to System -> Administration -> Hardware Drivers and choose the NVIDIA accelerated graphics driver (latest version).
Touchpad
thanks to http://bugs.debian.org/cgi-bin/bugreport.cgi?msg=10;att=0;bug=576456
You should disable the mouse plugin in gnome-settings-daemon, since gnome-control-center can't handle every possible touchpad setting via gnome-mouse-properties. Open a terminal and type
gconftool-2 --type boolean --set /apps/gnome_settings_daemon/plugins/mouse/active falseThen, create this file: /etc/hal/fdi/policy/99-x11-synaptics.fdi
<?xml version="1.0" encoding="UTF-8"?> <deviceinfo version="0.2"> <device> <match key="info.capabilities" contains="input.touchpad"> <match key="info.product" contains="appletouch"> <merge key="input.x11_driver" type="string">synaptics</merge> <merge key="input.x11_options.Device" type="string">/dev/psaux</merge> <merge key="input.x11_options.Protocol" type="string">auto-dev</merge> <merge key="input.x11_options.SendCoreEvents" type="string">true</merge> <merge key="input.x11_options.LeftEdge" type="string">100</merge> <merge key="input.x11_options.RightEdge" type="string">1120</merge> <merge key="input.x11_options.TopEdge" type="string">50</merge> <merge key="input.x11_options.BottomEdge" type="string">310</merge> <merge key="input.x11_options.FingerLow" type="string">5</merge> <merge key="input.x11_options.FingerHigh" type="string">20</merge> <merge key="input.x11_options.MaxTapTime" type="string">100</merge> <merge key="input.x11_options.MaxTapMove" type="string">150</merge> <merge key="input.x11_options.MaxDoubleTapTime" type="string">180</merge> <merge key="input.x11_options.VertScrollDelta" type="string">20</merge> <merge key="input.x11_options.HorizScrollDelta" type="string">50</merge> <merge key="input.x11_options.MinSpeed" type="string">0.49</merge> <merge key="input.x11_options.MaxSpeed" type="string">0.78</merge> <merge key="input.x11_options.AccelFactor" type="string">0.0010</merge> <merge key="input.x11_options.LockedDrags" type="string">false</merge> <merge key="input.x11_options.TapButton1" type="string">1</merge> <merge key="input.x11_options.TapButton2" type="string">3</merge> <merge key="input.x11_options.TapButton3" type="string">2</merge> <merge key="input.x11_options.VertTwoFingerScroll" type="string">true</merge> <merge key="input.x11_options.HorizTwoFingerScroll" type="string">false</merge> <merge key="input.x11_options.FastTaps" type="string">true</merge> <merge key="input.x11_options.VertEdgeScroll" type="string">false</merge> <merge key="input.x11_options.HorizEdgeScroll" type="string">false</merge> <merge key="input.x11_options.SHMConfig" type="string">true</merge> </match> </match> </device> </deviceinfo>If you want you can change these settings in order to reach your preferred config. Check man synaptics to find all options and tuning.
Keyboard functions
Volume Up, Volume Down, Volume Mute, Eject will work out-of-the-box.
Adjusting the screen brightness works out of the box with the default free graphics driver. But when you install the restricted NVIDIA graphics driver, it won't work.
There is a repository https://launchpad.net/~mactel-support/+archive/ppa with the package nvidia-bl-dkms, but this don't work for me.
ACPI, power management, etc
..now writing..
Shell/CTRL-ALT-Fn
Switching to shell with CTRL-ALT-Fn will work only with defaults free graphics driver. With NVIDIA proprietary drivers this won't work. If anyone has a solution, please post.
External Monitor
Works fine with proprietary NVIDIA graphics driver, you just need to configure it with the nvidia-settings tool - no reboot is needed. You can find it in System -> Administration.
Sound and Headphones
I get these working only with some settings in file /etc/modprobe.d/options - you may need to create it.
If you use this, you get poor sound quality but headphones working (you need to reboot)
options snd_hda_intel model=mbp3 power_save=5If you don't want to reboot, you can:
- close all audio applications
- unload the module snd-hda-intel typing a couple of times in a terminal
- and than reload the module with this command
If you want good audio quality but NO headphones working, you can instead use this in the same file as above, and than reboot - or if you don't want, you can do as before:
options snd_hda_intel model=acer-aspire-7730g power_save=5Microphone
The internal microphone works with both settings as in the section above.
Suspend/Hibernate
Suspend works out of the box. Hibernate won't work. If someone has some hints, please post :).
Remote Control
You have to install gnome-lirc-properties from repositories, and configure it following the wizard, choosing Apple Mac Mini IR Receiver with Custom remote control. Then go in System -> Preferences -> Infrared Remote Control, unlock the window, choose autodetect and select the IR receiver. Now you can test it: in the bottom of the window, you can see if you remote control works.
Then change the file /etc/lircd.conf.gnome into this:
begin remote name Apple_A1156 bits 8 eps 30 aeps 100 one 0 0 zero 0 0 pre_data_bits 24 pre_data 0x87EE81 gap 211982 toggle_bit_mask 0x0 ignore_mask 0x0000ff01 begin codes KEY_VOLUMEUP 0x0B KEY_VOLUMEDOWN 0x0D KEY_PREVIOUSSONG 0x08 KEY_NEXTSONG 0x07 KEY_PLAYPAUSE 0x04 KEY_MENU 0x02 end codes end remoteNow, create and make executable two files in your home directory-I created them in the "script" directory: they will let you adjust audio volume from shell: script/volume_up
A=`pacmd dump | grep "set-sink-volume " | cut -d " " -f 3` B=$((A + 0x01000)) if [ $(($B)) -gt $((0x10000)) ] then B=$((0x10000)) fi pactl set-sink-volume 0 `printf "0x%X" $B`script/volume_down
A=`pacmd dump | grep "set-sink-volume " | cut -d " " -f 3` B=$((A - 0x01000)) if [ $(($B)) -lt $((0x00000)) ] then B=$((0x00000)) fi pactl set-sink-volume 0 `printf "0x%X" $B`This two scripts are useful to control your audio level from the shell or in a script. If they don't work because you have some esoteric configs, maybe you can adjust them on line 3 - take a look at the output of the command
pacmd dumpin line beginning with "set-sink-volume" and adjust line 3 accordling.
Now, you have to create a file like this (this is my own config, you can change it according to your preferences) in your home directory: .lircrc
begin rhythmbox begin prog = Rhythmbox button = play config = playpause end begin prog = Rhythmbox button = pause config = pause end begin prog = Rhythmbox button = forward config = next end begin prog = RhythmBox button = backward config = previous end begin prog = RhythmBox button = fw config = seek_forward end begin prog = RhythmBox button = bw config = seek_backward end end rhythmbox begin prog = irexec button = volup config = $HOME/script/volume_up repeat = 2 end begin prog = irexec button = voldown config = $HOME/script/volume_down repeat = 2 end begin prog = irexec button = play config = rhythmbox-client end begin prog = irexec button = menu config = rhythmbox-client --set-rating 2 endand last add and enable the command "irexec --daemon" in System -> Preferences -> Session Properties (gnome-session-properties, from shell) - this will run irexec every time you log in into your home session and execute your favourite commands when you press something on your remote control.
With this .lircrc file:
- Pressing Play/Menu will start rhythmbox, if it is not already running
- Pressing vol+/vol- will change system volume
- Pressing Play will play/pause playback, if rhythmbox is running
- Pressing forward/backward will change song, if rhythmbox is running
- Pressing menu will rate with two stars the current song, if rhythmbox is running
You can change it as you prefere.
CategoryMac
|
|
5 Hacks You Didn’t Know You Could Do in Lucidchart
Product pro Angie Mecham expands users’ vision of how to use Lucidchart in her webinar on mastering the basics. Whether you’re a product manager mapping customer user flows, an HR manager building an org chart, or an engineer diagramming your AWS architecture, Angie shares tons of tips and tricks for creating, collaborating on, and consuming diagrams in Lucidchart.
During the webinar, she gives five hacks for working more efficiently in Lucidchart. In case you missed them, we’ve got a quick recap here. But remember that, in order to become a product pro like Angie, you’ll want to watch the full webinar.
Hack #1: Navigate across the canvas
Like Angie says in the webinar, this is the most important tip. Think of how much time you’ll save by zooming in and out in an instant or going from one end of your diagram to the other without having to rely on the scroll bars.
On a laptop, use your trackpad to move and zoom as you would on a touchscreen––two fingers to scroll and pinching to zoom. If you’re on a desktop or a laptop with a mouse, press and hold the spacebar to change the cursor to a little hand. You can then use the little hand to drag the canvas in any direction with your mouse. Use your mouse wheel to zoom in and out.
Lucidchart also works with many common keyboard shortcuts, like Command (or Control) C for copying and Command (or Control) V for pasting. To find all the shortcuts, go to “Help” in the menu bar of your Lucidchart document, and select “Hotkey Reference” to see the full list.
Hack #2: Edit your whole diagram at once
Don’t waste time formatting your diagram shape by shape. For example, you have a process diagram, but one of the boxes isn’t quite large enough for the text. You don’t want that single box to be larger than all the others, and you also don’t want to spend your afternoon resizing every single box.
Simply click the shape and go to “Select” in the menu bar. Go to “Shapes with Same” and then select “Shape Type” or one of the other options to select a particular set of shapes in your diagram. From this point, you can resize all the shapes to match so that your diagram looks neat and professional.
This hack doesn’t just work for resizing shapes—try it out to also change shape, text, and line styles or color all at once.

Hack #3: Stay in control with revision history
When you have a whole team working on a document, your diagram is bound to be changing rapidly. Thanks to revision history, you’re in control of your document even when you’ve invited others to collaborate.
By selecting the clock icon in the dock to the right of the canvas, you can access every single revision made to the document. When you click on a timestamp and the corresponding name, you’ll see what your document looked like at that point in time.
If your colleagues have gone a little too crazy and you need to get back to that selected diagram state, click the blue “Restore” button to revert your document back.
If you’re just curious about the direction a document has taken, click the black “New from revision” button to create a new document from any desired revision point so you can compare two diagrams side by side and decide which you prefer.

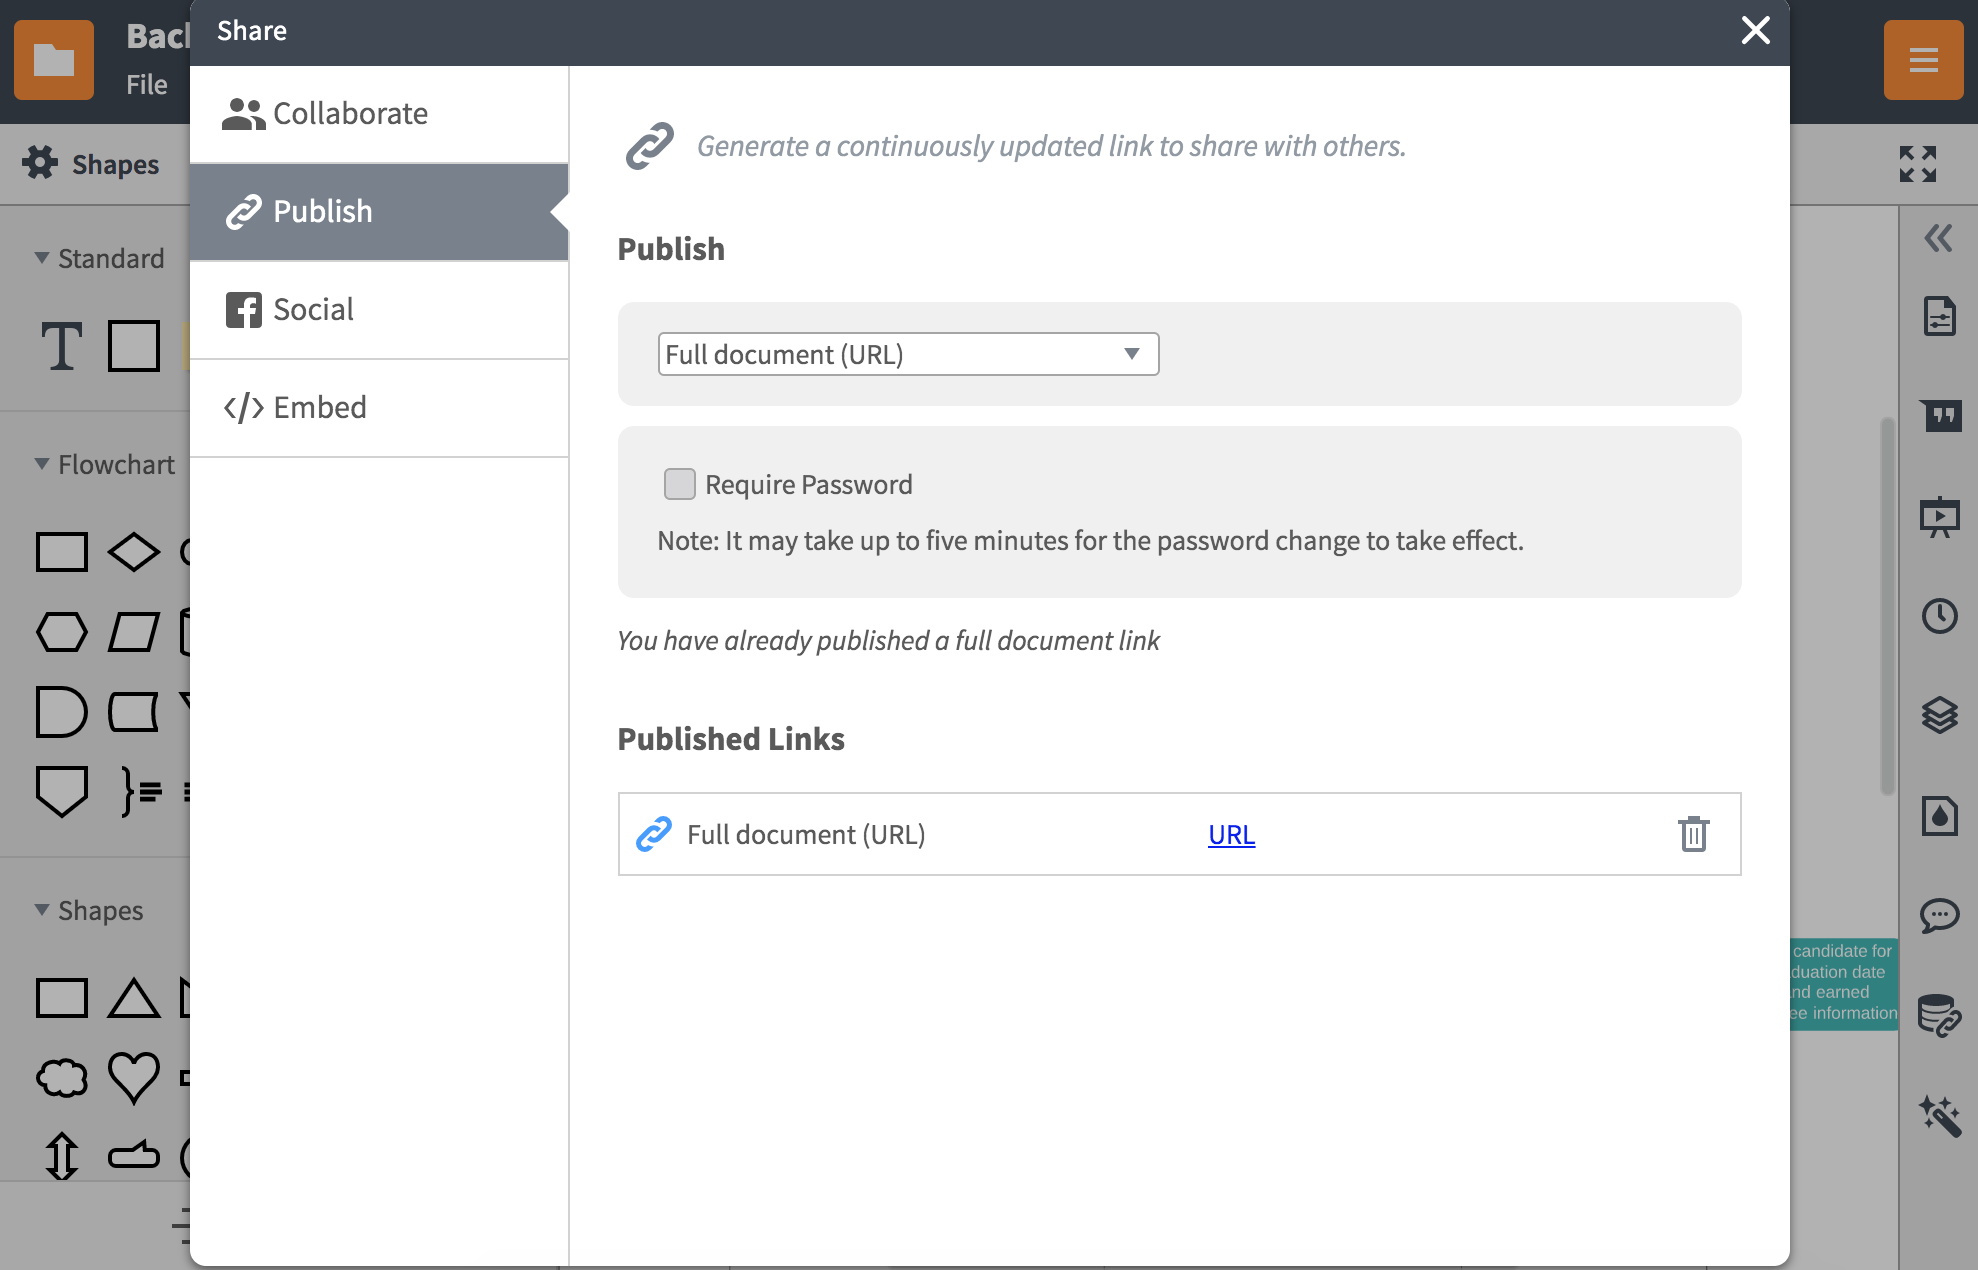
Hack #4: Share via URL
Sometimes you need to share documents with people who don’t have a Lucidchart account. When you open the “Share” menu, select “Publish,” and then “Generate Link.” You now have a live URL anyone can use to view a document without signing into Lucidchart.
Anyone with the URL can navigate all the pages of the document and bookmark the URL for future use. The best part is that whenever you make a change in Lucidchart, changes are live for those using the URL even before they refresh the page. This hack is an easy way to keep everyone involved and in the loop even while your document is constantly changing.
Hack #5: Draw a perfect line
It may sound simple, but Angie gets a lot of questions on how to draw a line not connected to any boxes. Good news—this is the easiest hack of the bunch. Just press “L” on your keyboard, and then format your line as needed.
But what about getting a line between shapes to behave just the right way? If you hover over any shape, you’ll see little red dots all around it. Pull a line from one of those dots and then extend it to the next shape until you see a blue halo appear. This is now a smart line, meaning that it will automatically readjust and reposition if you rearrange the shapes.

Another trick for drawing the perfect line is to hold Shift as you draw your line to keep it absolutely straight every time.
Now you’ve got the scoop on Angie’s top hacks, it’s time to implement them. Remember to go watch the full video for more tips on customizing shapes, commenting, using integrations, and more. And stay tuned for future live trainings!
Jump into Lucidchart and try these tips for yourself.
What’s New in the Sounding Keyboard and Mouse v2.5 by LUCiD serial key or number?
Screen Shot

System Requirements for Sounding Keyboard and Mouse v2.5 by LUCiD serial key or number
- First, download the Sounding Keyboard and Mouse v2.5 by LUCiD serial key or number
-
You can download its setup from given links:

Sounding Keyboard and Mouse v2.5 by LUCiD serial key or number & Free Download

Sounding Keyboard and Mouse v2.5 by LUCiD serial key or number& Key Download
